User Guide
Table of Contents
- Quick Start
- Command Summary
- Features
- Glossary
Introduction
Welcome to AcademyAssist, your ultimate solution for efficient student contact management, targeted at tuition centers operating in Singapore. This desktop application is designed to streamline your administrative tasks, allowing you to focus your efforts on keeping operations smooth and organized for optimal student support.
AcademyAssist is designed for a diverse range of users, primarily targeting tuition center administrators and administrative staff. Whether you are responsible for managing student information or need quick access to data for efficient operations, AcademyAssist is here to help.
AcademyAssist combines the power of a Command Line Interface (CLI) with the user-friendly aspects of a Graphical User Interface (GUI). This hybrid approach ensures that you can manage your student database with lightning-fast efficiency while still enjoying the visual benefits of modern software design.
Whether you’re a seasoned administrator or new to digital management systems, AcademyAssist is intuitive enough for beginners yet powerful enough for experts. With features like quick student addition, easy information retrieval, and automated data saving, AcademyAssist is set to revolutionize how you manage your tuition center.
Let’s embark on this journey to simpler, faster, and more effective student management!
Quick start
This guide provides step-by-step instructions for installing and running the AcademyAssist application for both non-technical and technical users. Please follow the instructions that correspond to your level of expertise.
Prerequisites
Before you begin, ensure you have Java 17 or above installed in your computer.
Check Java Version
- Open up command prompt (Windows) or terminal (macOS, Linux).
- Type
java -versionand press Enter to check your Java version. - If your Java version is not
17or above, you will need to install the latest version.
Download Java
- Download the latest version of Java from the Oracle website.
- For Windows users: Download the Windows x64 Installer.
- For macOS users: Download the macOS Installer.
- For Linux users: Download the Linux x64 Compressed Archive.
- Follow the installation instructions provided on the download page.
- After installation, run the
java -versioncommand again to confirm that the installation was successful. - Close the terminal after confirming the installation.
Download AcademyAssist
Download the latest academyassist.jar file from the latest release in our GitHub repository.
You can find the file under the Assets section of the release.
Things to note before you start
When you first use AcademyAssist, some sample student contacts have been added to help you familiarise yourself with our features. Once you are ready to manage your tuition center’s students, simply use the clear command to clear all existing contacts and reset the StudentID.
Setting up AcademyAssist
Non-Technical Users
- Create a new folder at your Desktop. (e.g.
AcademyAssist) - Move the downloaded
academyassist.jarfile into this folder. - Open the command prompt (Windows) or terminal (macOS, Linux).
- Navigate to the folder by typing the following command and pressing Enter:
- For Windows:
cd Desktop\AcademyAssist - For macOS and Linux:
cd Desktop/AcademyAssist
- For Windows:
- Type
java -jar academyassist.jarand press Enter to start the app.
Technical Users
- Move the downloaded
academyassist.jarfile to a directory of your choice. - Open the command prompt (Windows) or terminal (macOS, Linux).
- Navigate to the directory where the
academyassist.jarfile is located. - Type
java -jar academyassist.jarand press Enter to start the app.
Getting Started
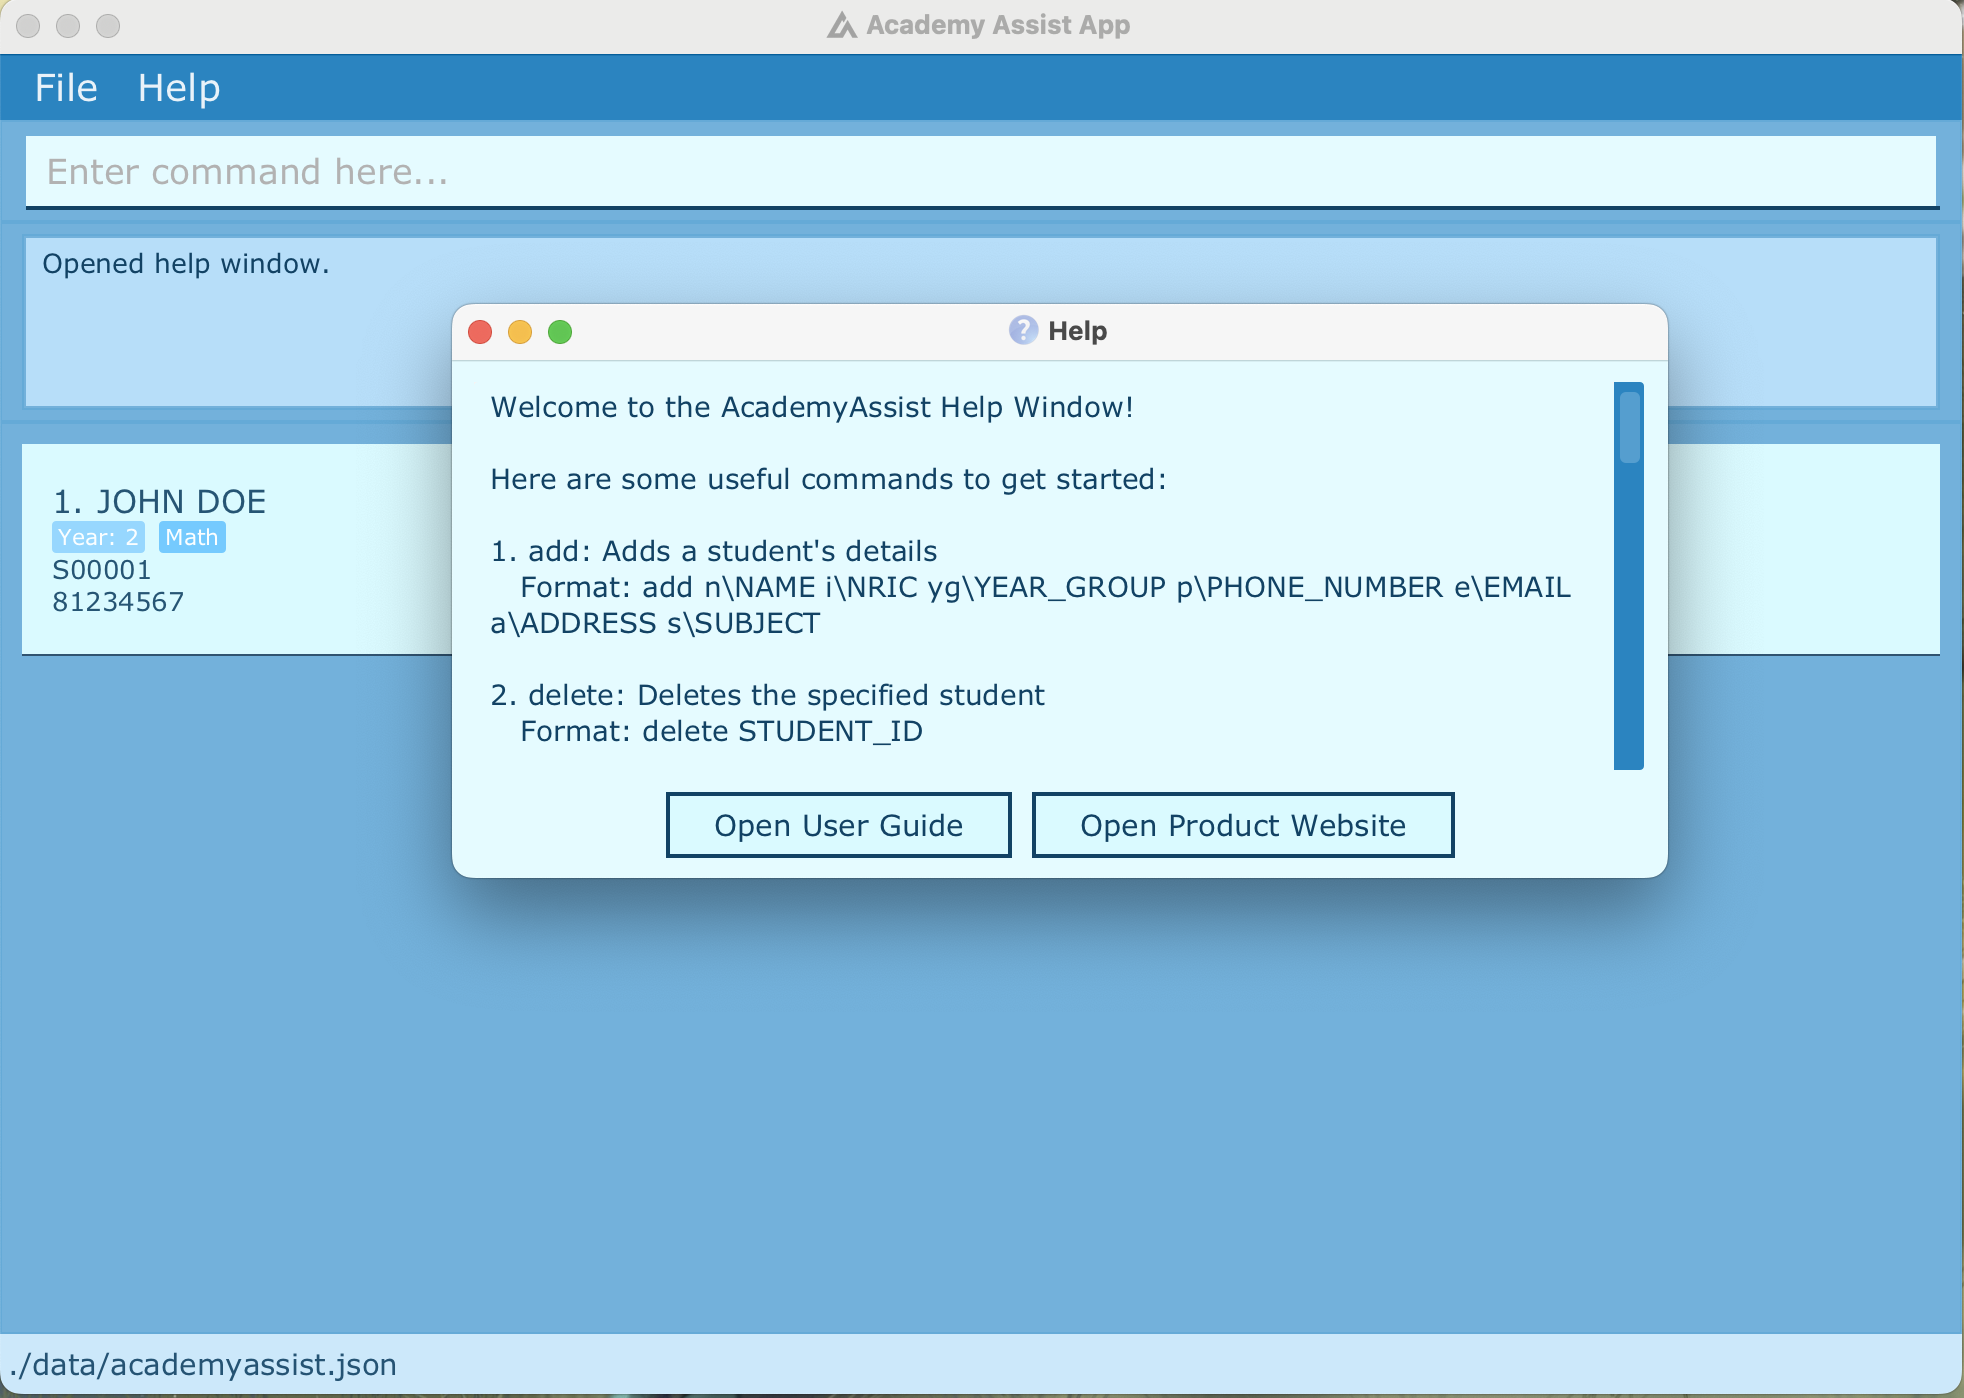
For all users, upon first running the application, a help window will appear automatically, providing details on some basic features. You may refer to the Command Summary section for a quick overview of the available commands. The Features section provides a more detailed explanation of each feature.
User Interface Overview
Main Window
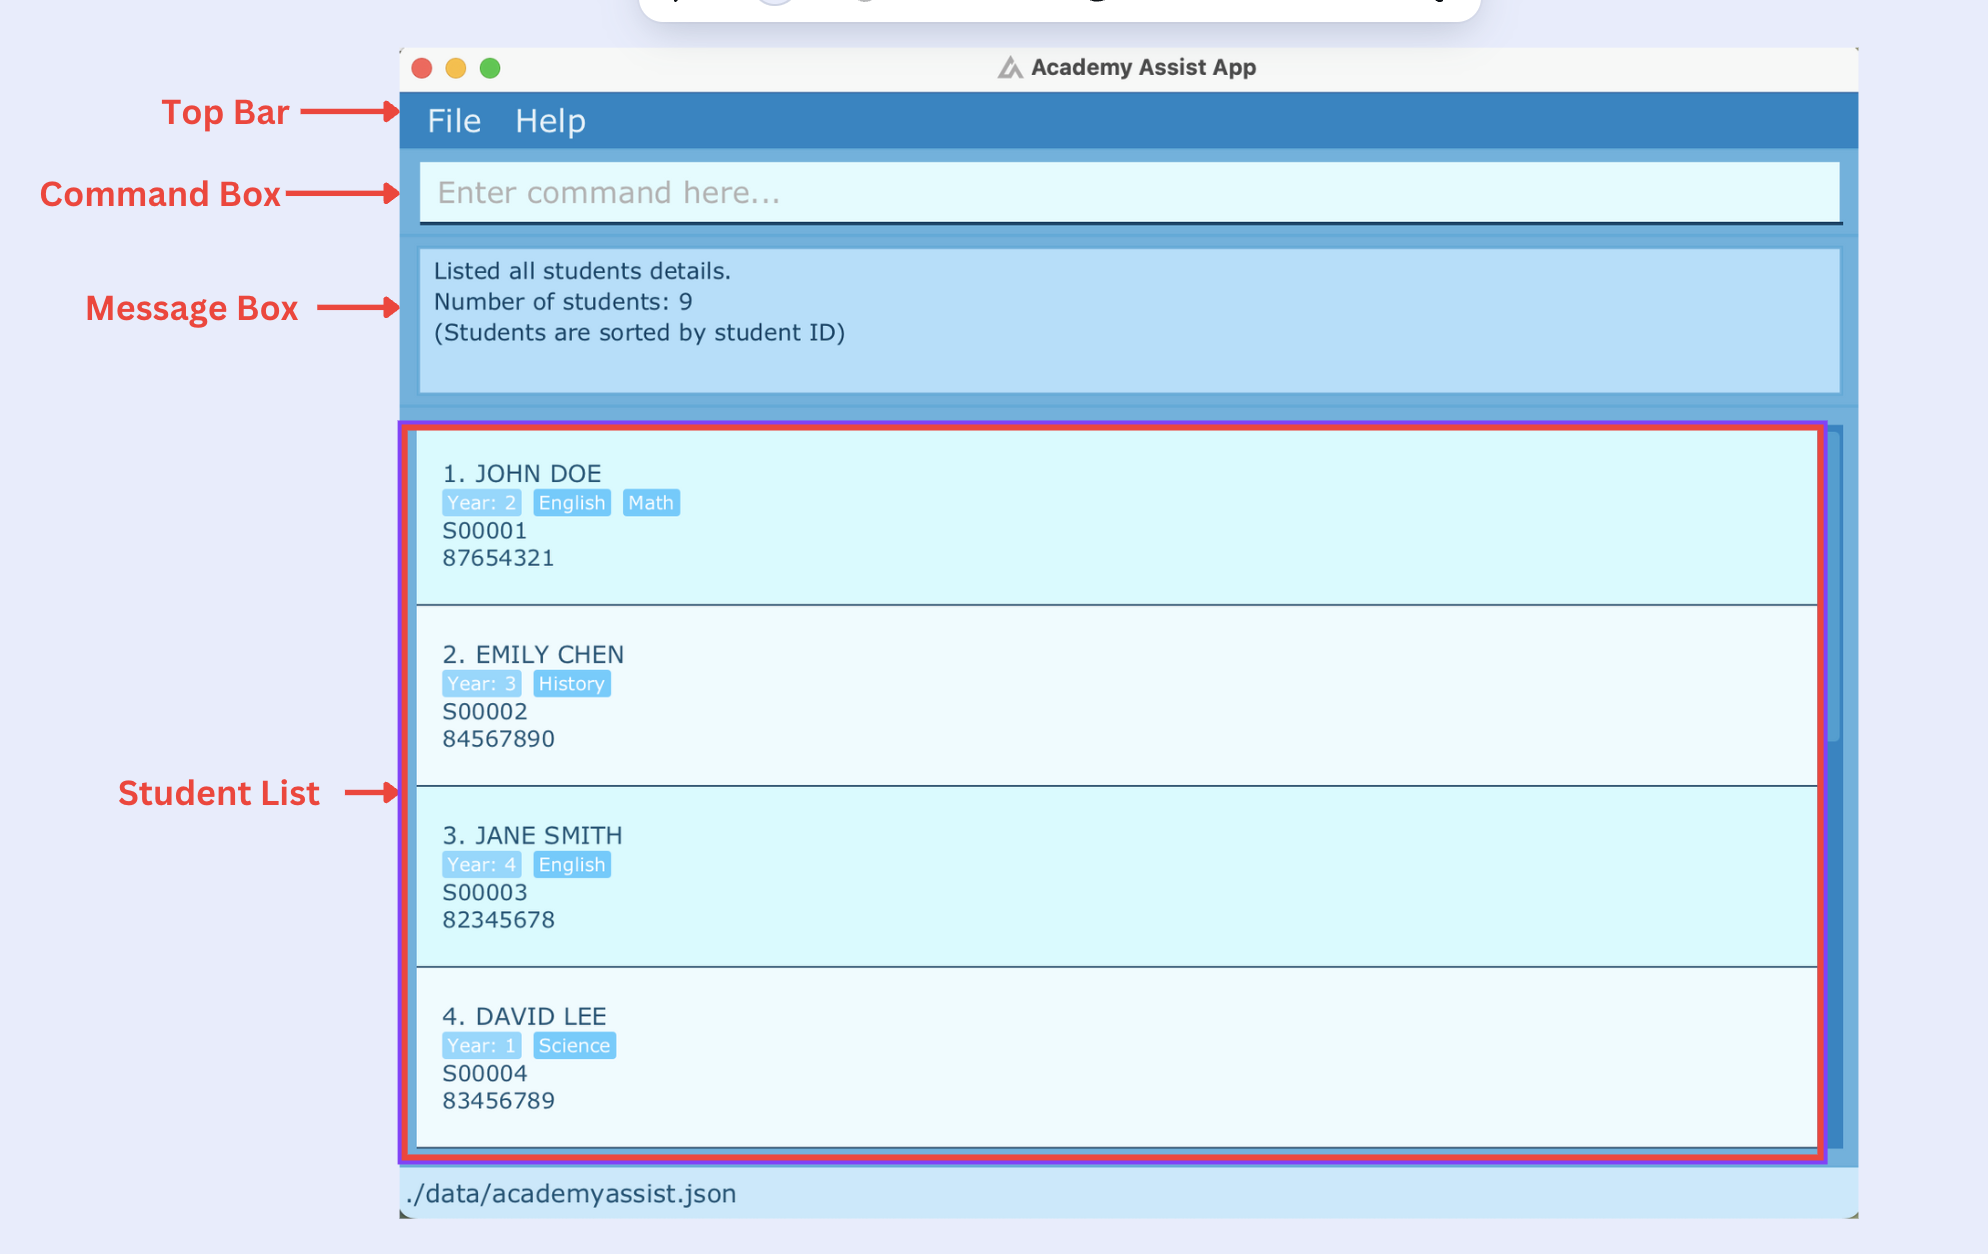
-
Top Bar: Contains the following buttons
- Help: Click on this to view the help window.
- Exit: Click on this to exit the application.
- Command Box: Enter your commands here to interact with the application.
- Message Box: Displays messages to the user. Which includes success messages, error messages, and help messages.
- Student List: Displays the list of students in the system. Each student is represented by a Student Card.
Student Card

- Name: The name of the student.
- Year Group: The year group of the student.
- Subject List: The subject(s) the student is taking.
- Student ID: The unique identifier for the student.
- Phone Number: The phone number of the student or guardian.
Using AcademyAssist
To interact with AcademyAssist, type your commands into the command box and press Enter. Here are some sample commands you can try out to get started:
- Add a student:
add n\John Doe i\S1234567A yg\2 p\91234567 e\johndoe@yahoo.com a\10 Orchard Road s\Science s\Math - Edit a student:
edit S00001 a\Clementi Street 14 - Delete a student:
delete S00001 - Find a student:
find John - List all students:
list - View a student’s details:
detail S00001 - Sort students by name:
sort by\name - Filter students by year group:
filter yg\2 - Add a subject to a student:
addsubject S00001 s\Science - Track the number of students taking each subject:
tracksubject
No worries if you make a mistake - AcademyAssist will guide you through the messages displayed in the message box.
You can also use the help command to view the help window at any time.
Conclusion
You are now ready to use AcademyAssist! If you encounter any issues during installation or usage, please refer to this documentation or contact us via our email (academyassist@gmail.com). Enjoy using the application!
Command Summary
General Format
The general format of commands in AcademyAssist is as follows:
COMMAND [PARAMETERS]
Where:
-
COMMANDrefers to the action you want to perform (e.g.,add,delete,edit). -
PARAMETERSare the inputs required for the command to execute successfully.
Command Format and Examples
This section provides a quick overview of the available commands for managing student records. Each command is accompanied by its format and an example to help you understand how to use it effectively.
| Action | Command Format | Example |
|---|---|---|
| Add Student | add n\NAME i\NRIC yg\YEARGROUP p\PHONE e\EMAIL a\ADDRESS s\SUBJECT [s\MORE_SUBJECTS]... |
add n\John Doe i\T3840859A yg\3 p\81003999 e\johndoe@gmail.com a\9 Smith Street s\Science |
| Delete Student | delete STUDENT_ID |
delete S00001 |
| Edit Student | edit STUDENT_ID FIELD\NEW_VALUE |
edit S00001 a\New_Address |
| List Students | list |
|
| View Student | detail STUDENT_ID |
detail S00001 |
| Find Student | find NAME [MORE_NAMES] |
find John Jane |
| Filter Students | filter FIELD\VALUE |
filter yg\2 |
| Add Subject | addsubject STUDENT_ID s\SUBJECT [s\MORE_SUBJECTS]... |
addsubject S00003 s\Science |
| Track Subjects | tracksubject |
|
| Sort Students | sort by\FIELD |
sort by\name |
| Clear Data | clear |
|
| Get Help | help |
|
| Exit | exit |
Command Parameters Reference
In this section, you’ll find detailed information about the parameters for each command. Each command is broken down into its constituent parameters, including their prefixes, descriptions, and constraints. This reference will guide you in ensuring that your inputs are valid and conform to the required formats.
| Command | Parameter | Prefix | Description | Constraints |
|---|---|---|---|---|
| Add Student | NAME |
n\ |
Name of the student. | 2-255 characters, only alphabets, spaces, and special characters (-/’), cannot start/end with special characters, no consecutive special characters and spaces. |
NRIC |
i\ |
NRIC number of the student. | Must start with S, T, F, G, M, followed by 7 digits and an alphabet (e.g., S1234567A). |
|
YEARGROUP |
yg\ |
Year group of the student. | Must be a number between 1-13. | |
PHONE |
p\ |
Phone number of the student. | 4-20 digits long, no spaces. | |
EMAIL |
e\ |
Email address of the student. | Must follow the format local-part@domain. For more details refer to add feature section. |
|
ADDRESS |
a\ |
Address of the student. | Maximum 300 characters, can contain any characters, cannot be empty. | |
SUBJECT |
s\ |
Subject(s) the student is enrolled in. | Must be one of the available subjects; can add multiple subjects using repeated s\ fields. |
|
| Delete Student | STUDENT_ID |
- | ID of the student to be deleted. | Must be in the format S followed by a 5-digit number (e.g., S00001). |
| Edit Student | STUDENT_ID |
- | ID of the student to be edited. | Must be in the format S followed by a 5-digit number (e.g., S00001). |
FIELD\NEW_VALUE |
n\ , i\ , yg\ , p\ , e\ , a\ or s\
|
Field to be edited (e.g., Name(n), NRIC(i), Year Group(yg), Phone(p), Email(e), Address(a), Subject(s)) and new value for the specified field. | FIELD must be one of the specified fields and NEW_VALUE must follow the constraints of the specified field. | |
| View Student Detail | STUDENT_ID |
- | ID of the student whose details are to be viewed. | Must be in the format S followed by a 5-digit number (e.g., S00001). |
| Find Student | KEYWORD |
- | Keyword(s) to search for student names. | Each keyword must be between 1-255 characters long contains only alphabets and special characters (-/’), separated by spaces. |
| Filter Students | FIELD\VALUE |
yg\ or s\
|
Field and value to filter by (year group or subject). | FIELD must be either yg for year group or s for subject and VALUE must follow the constraints of the specified field. |
| Add Subject | STUDENT_ID |
- | ID of the student to whom subjects are to be added. | Must be in the format S followed by a 5-digit number (e.g., S00001). |
SUBJECT |
s\ |
Subject(s) to be added to the student’s record. | Must be one of the available subjects; can add multiple subjects using repeated s\ fields. |
|
| Track Subjects | - | - | No parameters required. | - |
| Clear Data | - | - | No parameters required. | - |
| Get Help | - | - | No parameters required. | - |
| Exit | - | - | No parameters required. | - |
Features
-
Words in
UPPER_CASEare the inputs to be supplied by the user. e.gdelete STUDENT_IDmeans the user has to enter the ID number of the student to be deleted. -
Every student added will be assigned a unique, non-modifiable
STUDENT_IDthat begins with S followed by a 5 digit number (e.g. S00003).
STUDENT_ID of a student is non-replaceable once deleted. i.e. if you have one student with STUDENT_ID
S00001 and you delete that student, the next student you add will be assigned the next STUDENT_ID e.g. S00002
(instead of replacing S00001).
-
Parameters can be in any order. e.g. if the command specifies
n\NAME p\PHONE_NUMBER,p\PHONE_NUMBER n\NAMEis also acceptable. -
Items in square brackets are optional. e.g.
s\SUBJECT [s\MORE_SUBJECTS]can be used ass\SUBJECTors\SUBJECT s\MORE_SUBJECTS. -
Items with
...after them can be repeated. e.g.s\SUBJECT [s\MORE_SUBJECTS]...can be used ass\SUBJECT,s\SUBJECT s\SUBJECT,s\SUBJECT s\SUBJECT s\SUBJECT. -
Item are compulsory unless specified as optional. e.g.
add n\NAME i\NRIC yg\YEARGROUP p\PHONE e\EMAIL a\ADDRESS s\SUBJECT [s\MORE_SUBJECTS]...means that all parameters are compulsory except for[s\MORE_SUBJECTS]. -
Commands are case-sensitive (e.g.,
addis not the same asAdd). Hence, commands should be in lowercase. -
Prefixes are case-sensitive (e.g.,
n\is not the same asN\). Hence, prefixes should be in lowercase. -
Parameters are case-insensitive (e.g.,
Science,SCIENCE,scienceare treated as the same) except for sort function. -
Leading and trailing spaces will be removed from the parameters. Hence, the length of the parameters is not affected by the leading and trailing spaces.
-
Extraneous parameters for commands that do not take in parameters (such as
tracksubject,help,list,exitandclear) will be ignored.
e.g. if the command specifieshelp 123, it will be interpreted ashelp. -
If you are using a PDF version of this document, be careful when copying and pasting commands that span multiple lines as space characters surrounding line-breaks may be omitted when copied over to the application.
Student Management
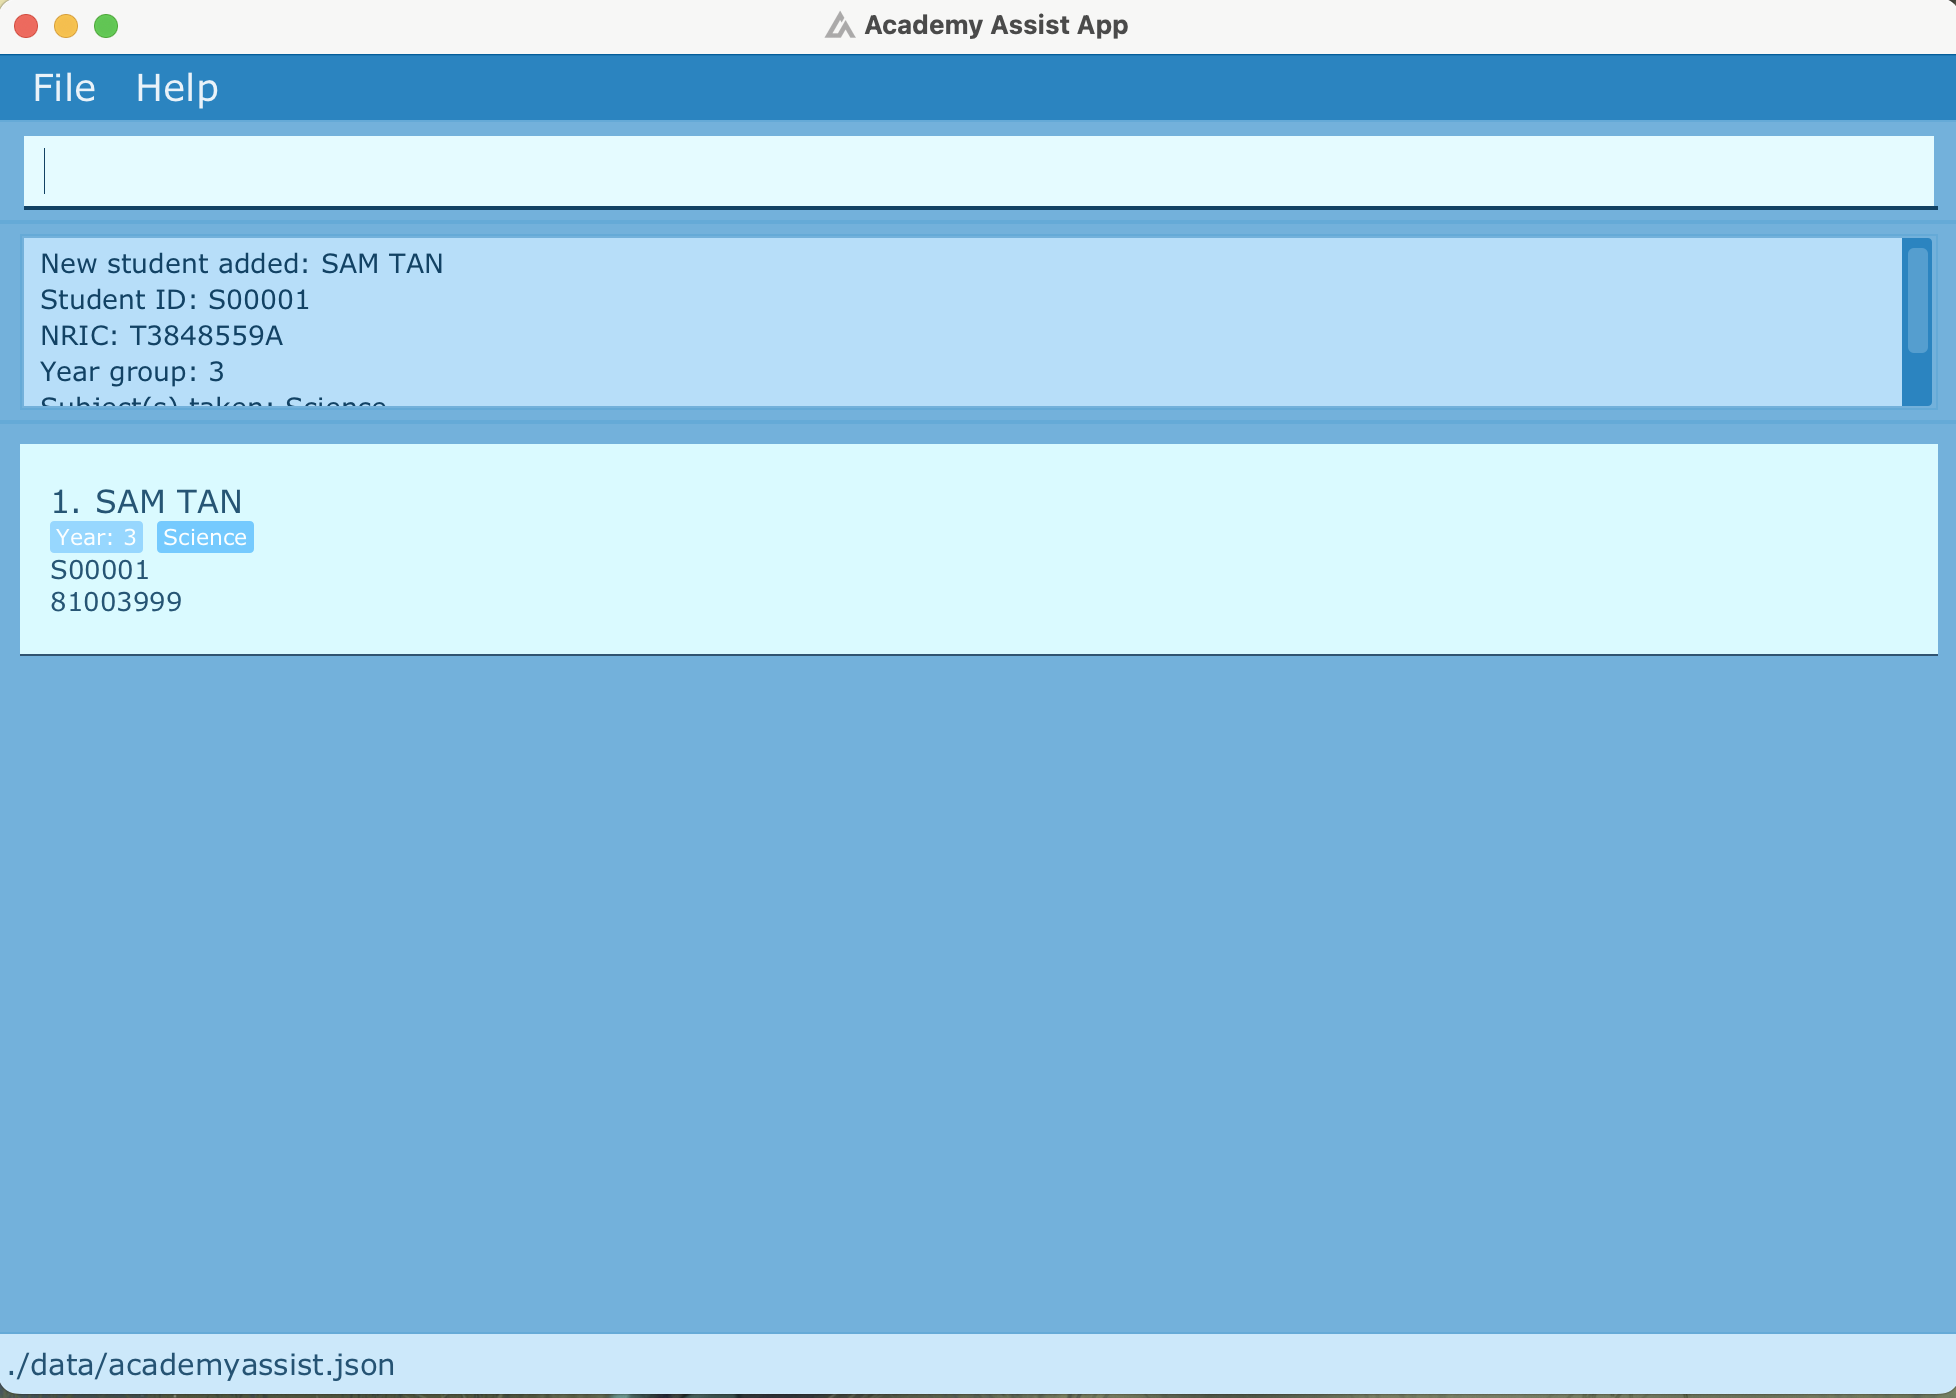
Adding a student : add
Adds a new student to the student management system.
Format: add n\NAME i\NRIC yg\YEARGROUP p\PHONE e\EMAIL a\ADDRESS s\SUBJECT [s\MORE_SUBJECTS]...
Parameters Constraints:
-
NAME: Must not be blank, should be 2 to 255 characters long, contain only alphabets, spaces, and the special characters (-/’) excluding parenthesis, start and end with an alphabet, and not have more than one consecutive special character or space. -
NRIC: Should follow the format of Singaporean IC and FIN numbers. It should start with one ofS, T, F, G, Mfollowed by a 7-digit number and another alphabet (e.g., S1234567A).
-
YEAR_GROUP: Should be a number within 1-13 (which represents primary school years 1 - 6 and secondary school years 7 - 13). -
PHONE_NUMBER: Should only contain number. It should be between 4 and 20 digits long with no spaces in between. -
EMAIL: Should follow the format local-part@domain.-
local-part: Must start and end with an alphanumeric character. It can include letters, digits, and the special
characters
+,_,.,-, but not consecutively or at the start/end. - domain: Made of domain labels separated by periods. Each label must start and end with an alphanumeric character and can contain hyphens, but not consecutively. The domain must end in a label at least 2 characters long.
-
local-part: Must start and end with an alphanumeric character. It can include letters, digits, and the special
characters
-
ADDRESS: Allow any characters and should not be empty. The maximum length is 300 characters including spaces in between. -
SUBJECT: Only the subjects listed below are allowed.- Subjects available: English, Chinese, Malay, Tamil, Math, Further Math, Science, History, Geography, Literature, Economics, Accounting, Business, Physics, Chemistry, Biology and Computing.
-
[MORE_SUBJECTS]: Optional, and you can add multiple subjects by repeating thes\field. The same constraints asSUBJECTapply.
s\Science s\Science, only one Science subject
will be added.
addsubject, edit, detail and delete.
Examples:
-
add n\Sam Tan i\T3848559A yg\3 p\81003999 e\samtan@gmail.com a\9 Smith Street \Science- Adds a student named Sam Tan the respective details and the subject Science.
-
add n\John Doe i\S1234567A yg\2 p\91234567 e\johndoe@yahoo.com a\10 Orchard Road s\Science s\Math- Adds a student named John Doe with the respective details and the subjects Science and Math.
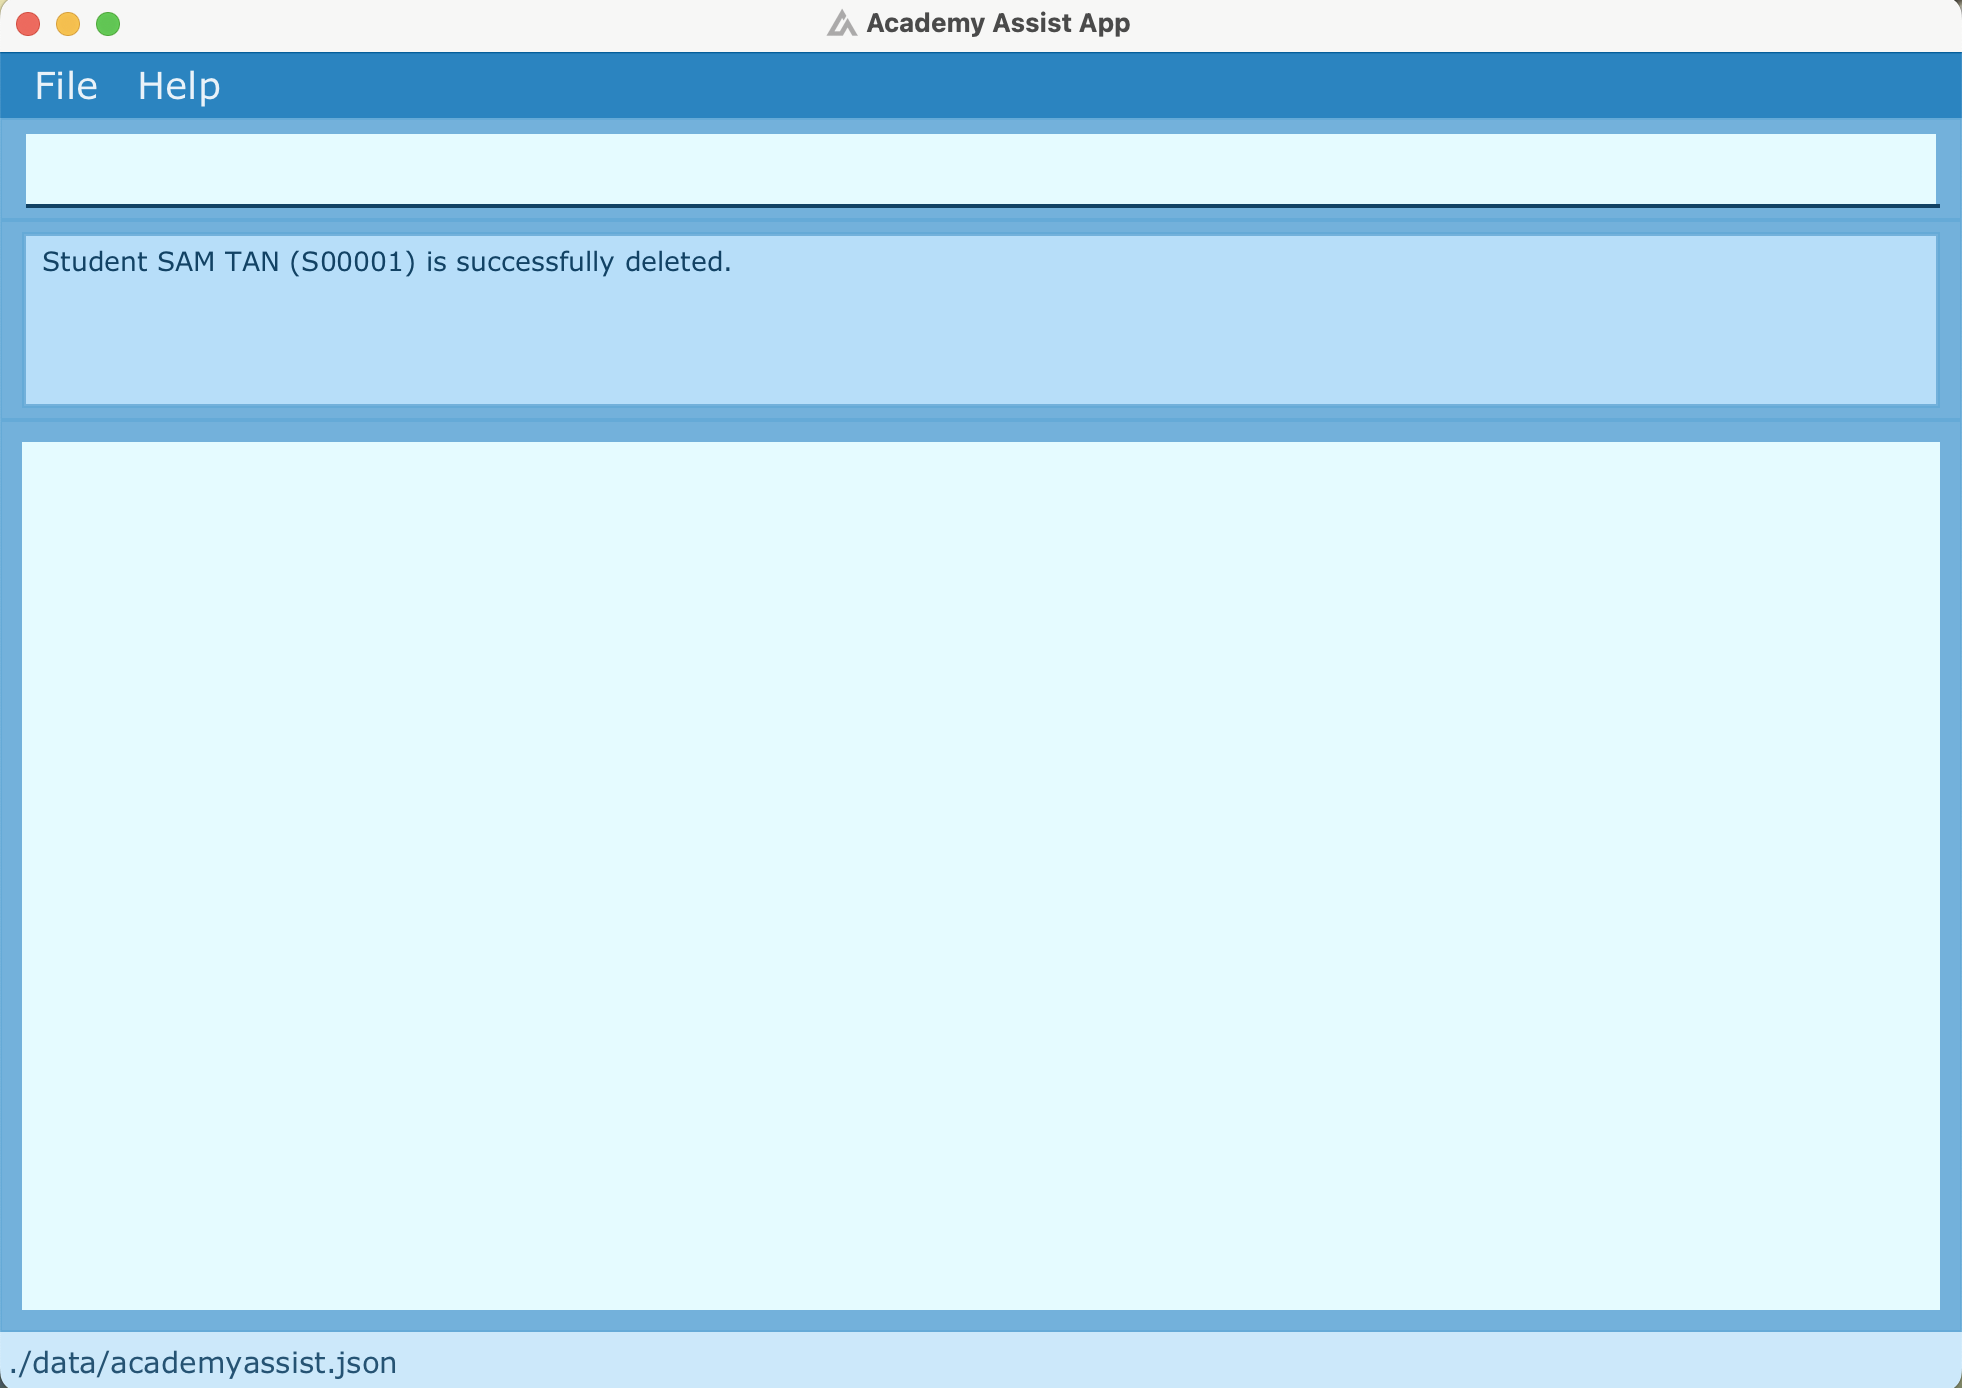
Deleting a student : delete
Removes a student from the tuition center management system.
Format: delete STUDENT_ID
-
STUDENT_ID: Should begin with S followed by a 5-digit, starting from 00001 to 99999.- The ID of a student is automatically assigned when the student contact is first added and can be found by viewing the student’s details.
STUDENT_ID of a student is non-replaceable once deleted. i.e. if you have one student with STUDENT_ID S00001 and you delete that student, the next student you add will be assigned the next STUDENT_ID e.g. S00002
(instead of replacing S00001).
Examples:
-
delete S00001- Deletes the student with the ID S00001.
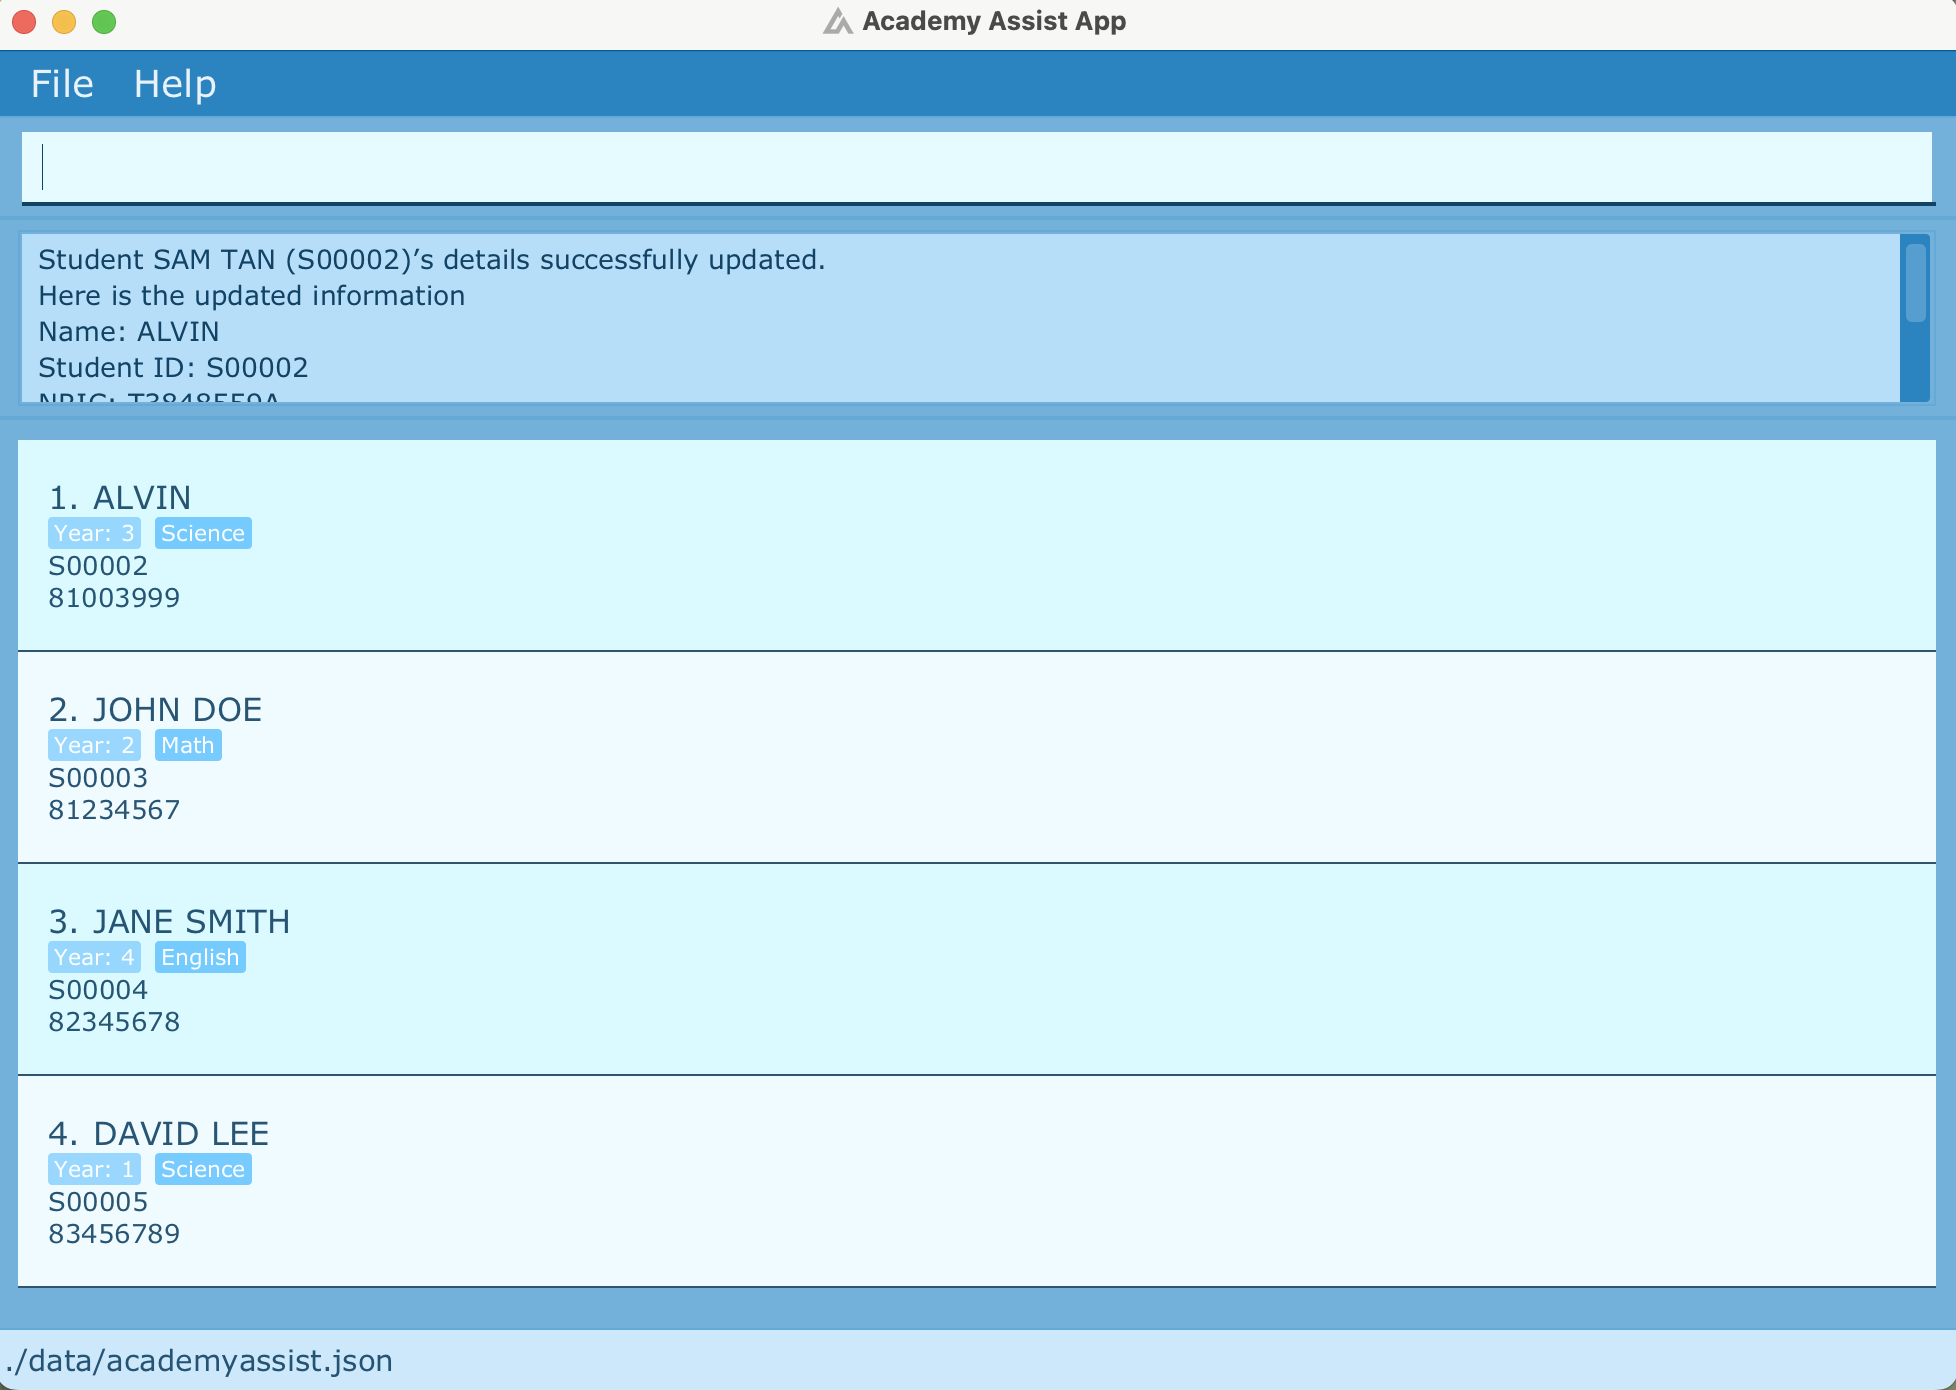
Editing a student : edit
Edits an existing student’s details in the system.
Format: edit STUDENT_ID FIELD\NEW_VALUE
-
STUDENT_ID: Should begin with S followed by a 5-digit, starting from 00001 to 99999.- The ID of a student is automatically assigned when the student contact is first added and can be found by viewing the student’s details.
-
FIELD: Can be one of: Name(n\), NRIC(i\), Year Group(yg\), Phone Number(p\), Email(e\), Address(a\), or Subject taken(s\). -
NEW_VALUE: Should follow the constraints of the specified field. You may refer to the constraints of each field in the add feature section or the Command Parameters Reference section.
Examples:
-
edit S00001 a\New_Address- Edits the address of the student with the ID S00001 to “New_Address”.
-
edit s00002 p\91234567 a\New_Address- Edits the phone number and address of the student with the ID S00002 to “91234567” and “New_Address” respectively.
addsubject command. You may refer to the section
“Adding subject(s) to a student” under “Subject Management” for more details.
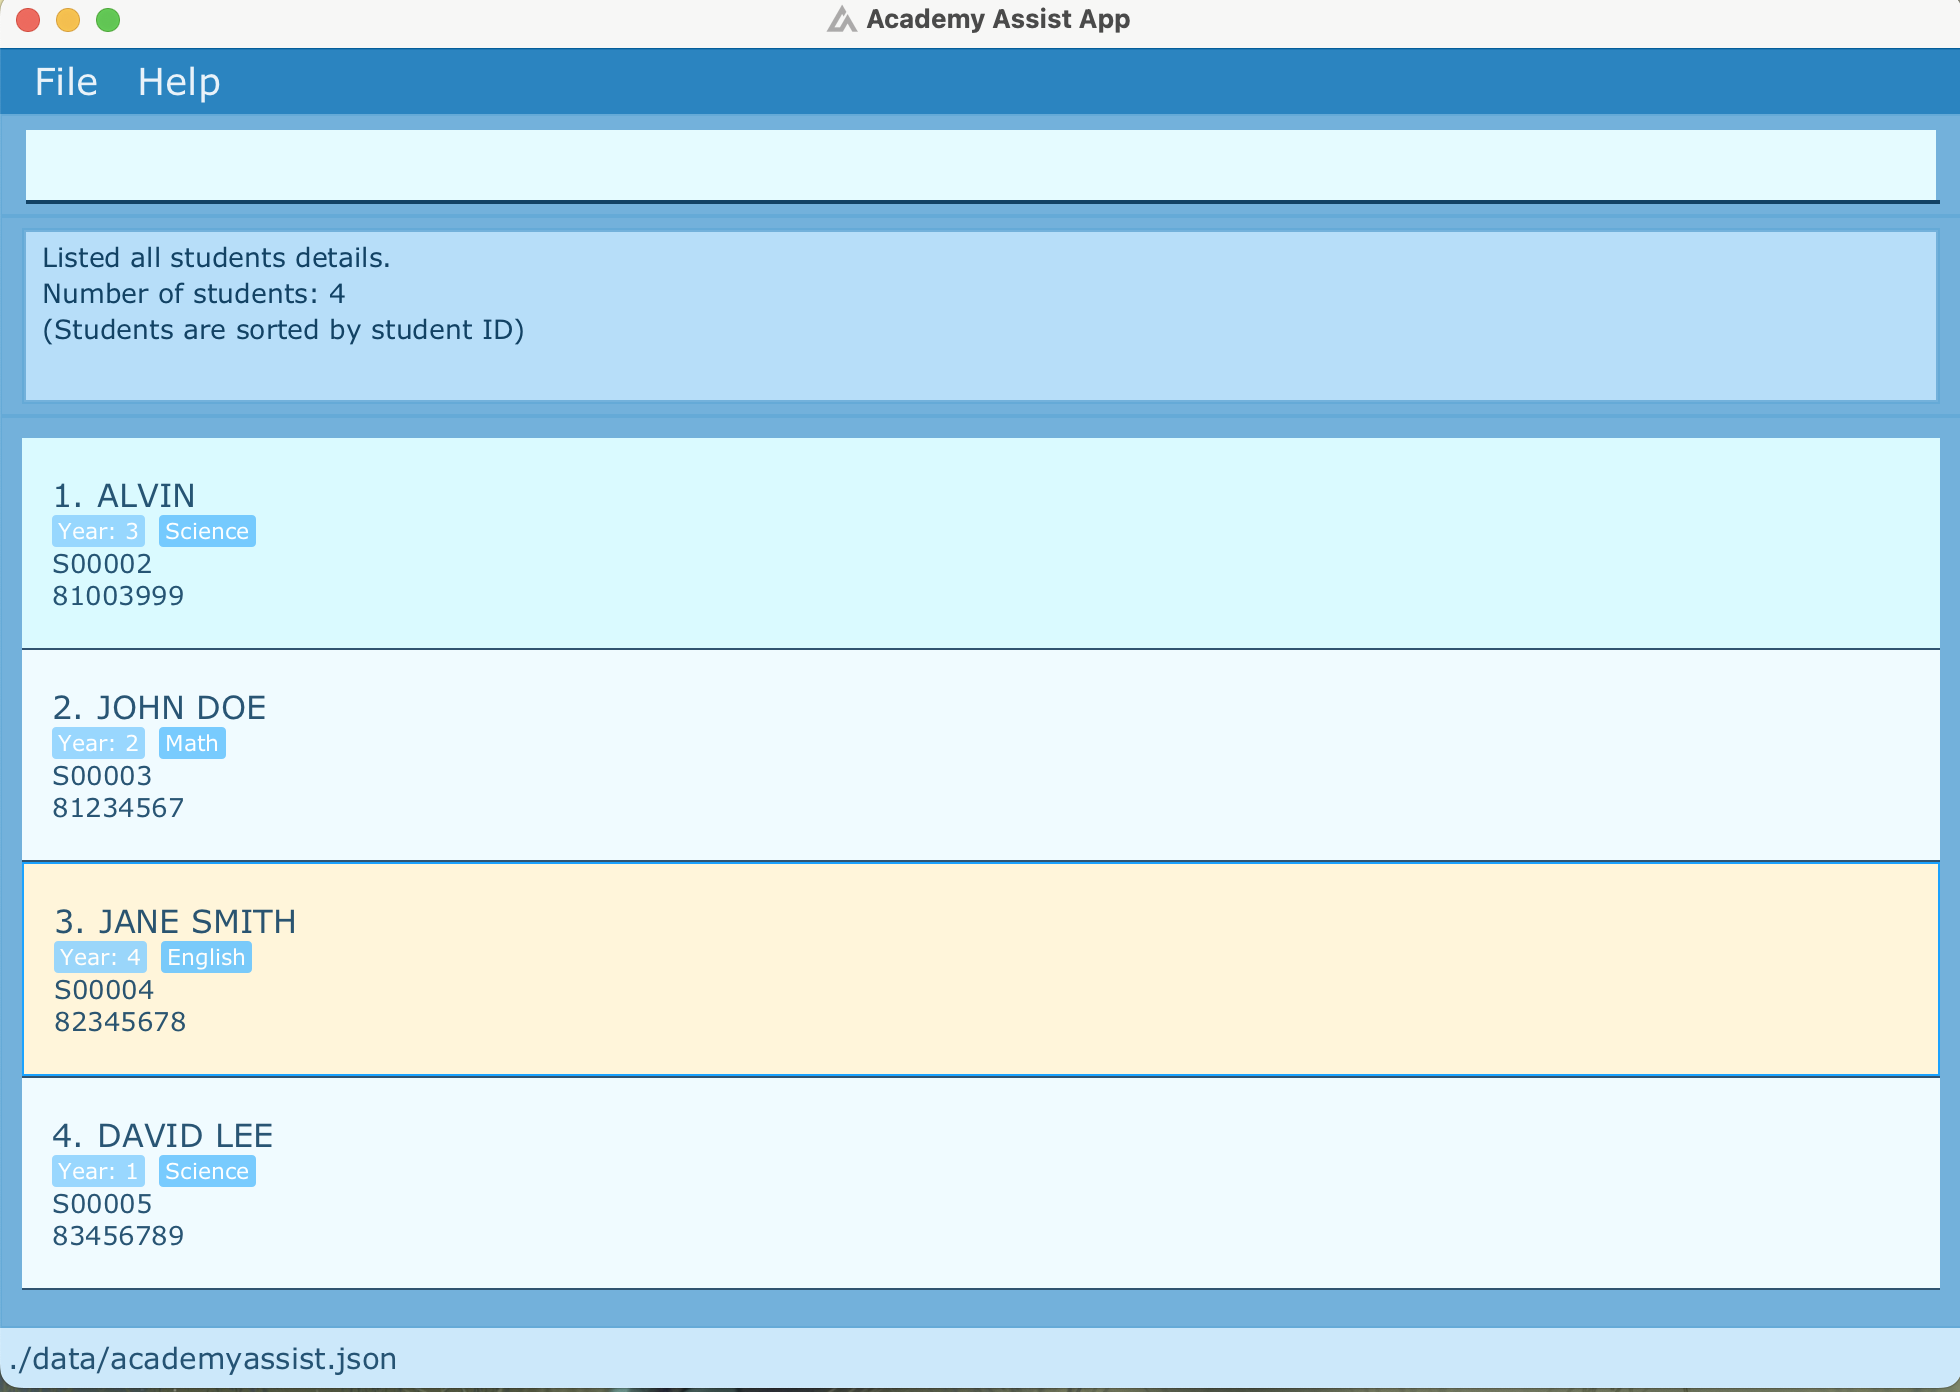
Listing all students : list
Shows a list of all students in the system.
Format: list
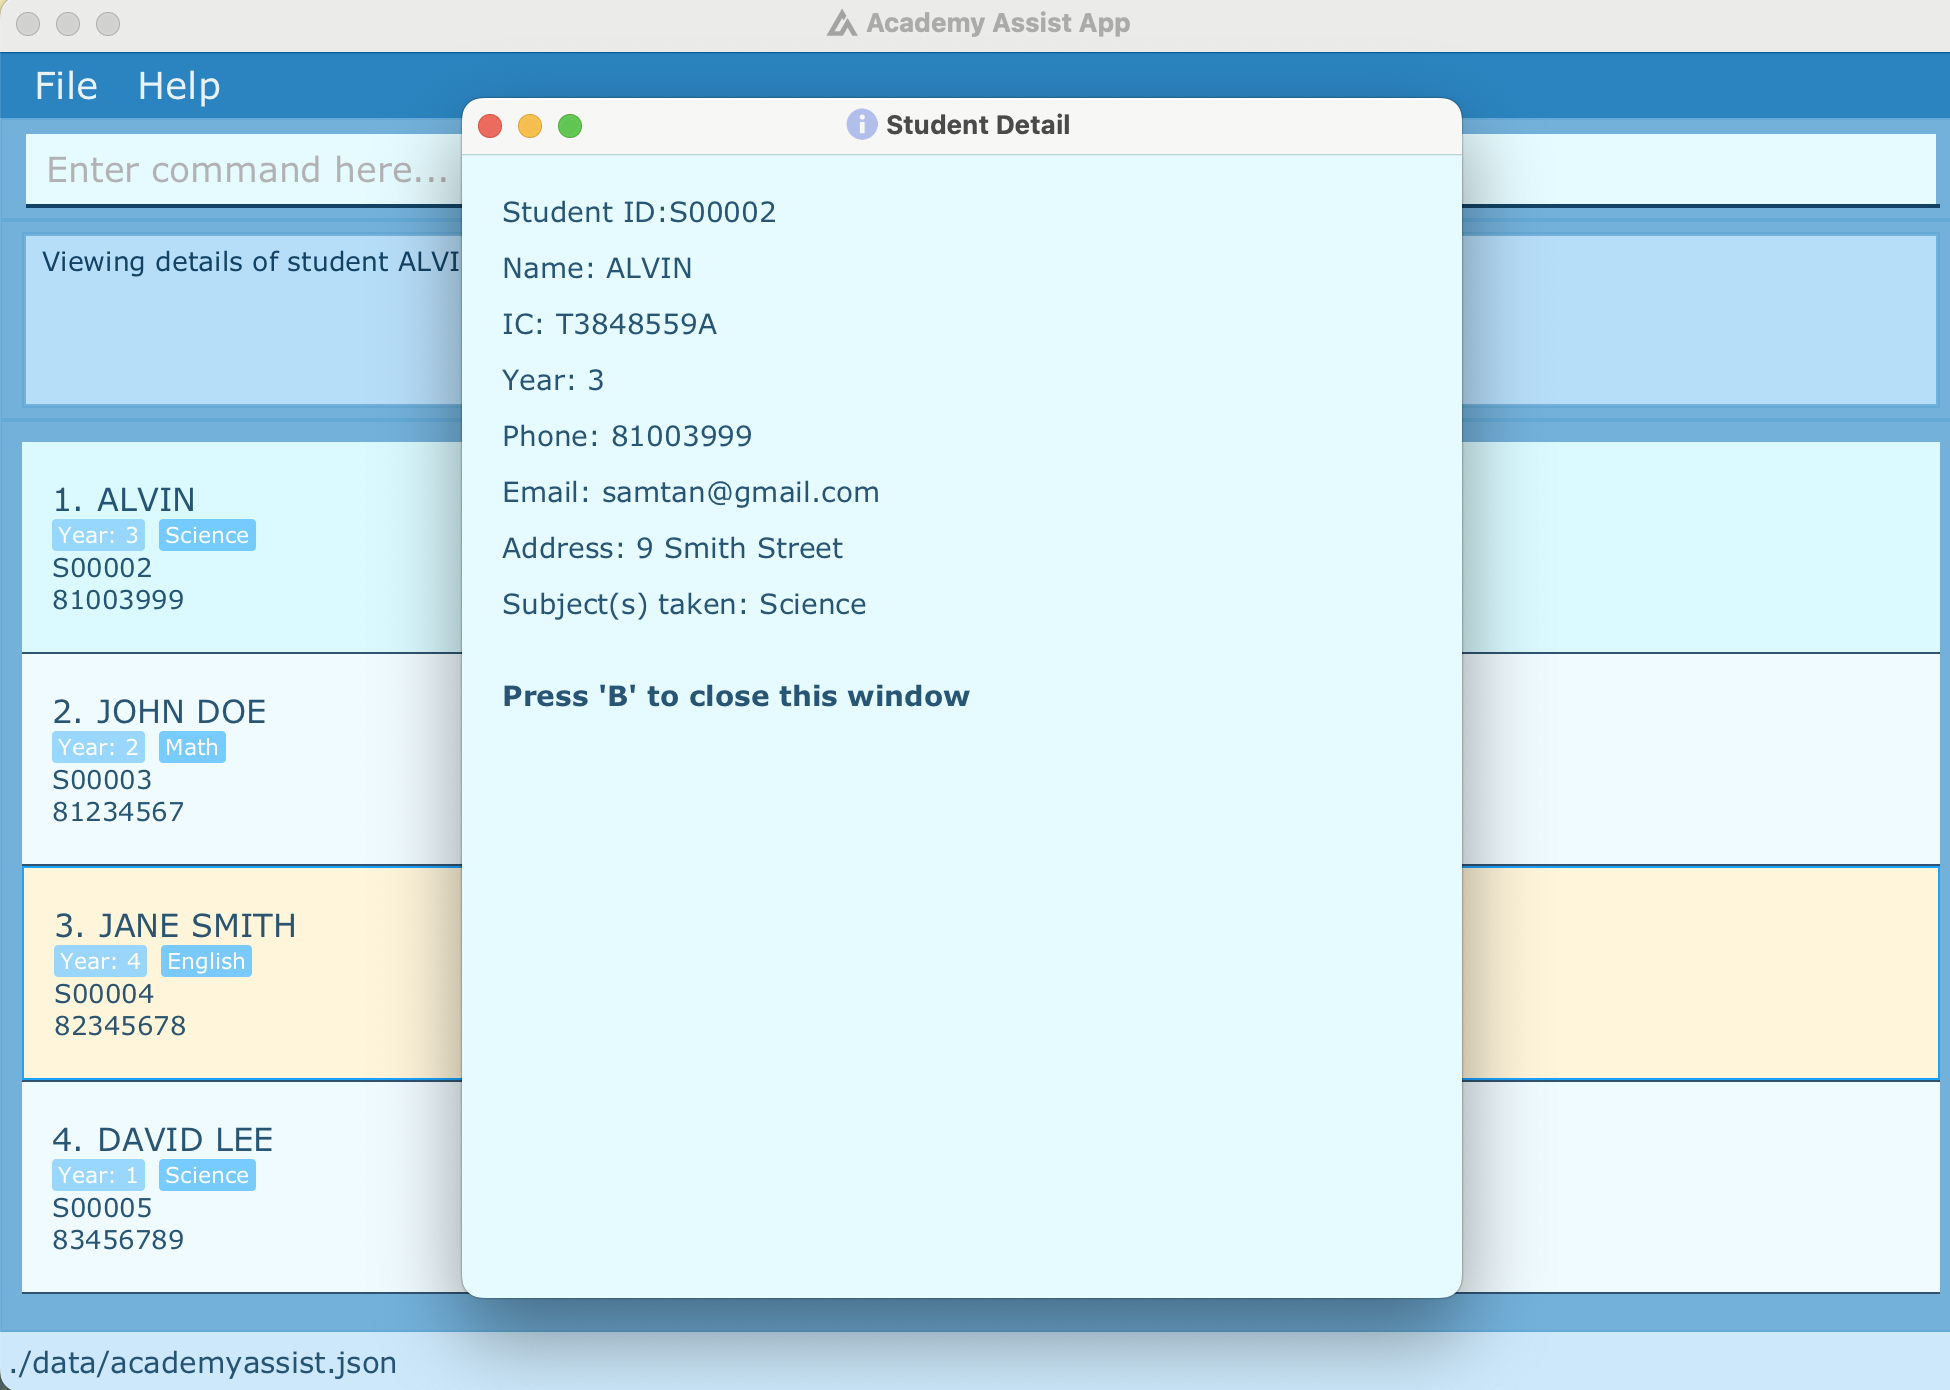
Viewing a student’s detail : detail
Displays a window that shows the student’s details.
Format: detail STUDENT_ID
-
STUDENT_ID: Should begin with S followed by a 5-digit, starting from 00001 to 99999.- The ID of a student is automatically assigned when the student contact is first added and can be found by viewing the student’s details.
- The student’s details will be displayed in a pop-up window.
- User may use keyboard shortcut
Bto close the pop-up window.
Examples:
-
detail S00001- Displays the details of the student with the ID S00001.
Searching and Sorting
list command.
Finding students : find
Finds students whose name contains any of the given keywords.
Format: find KEYWORD [MORE_KEYWORDS]
- The search is case-insensitive (i.e. John, JOHN, john are all treated the same way).
- You can only search for a student by their name.
-
KEYWORD: Each keyword must be between 1-255 characters long contains only alphabets and special characters (-/’) excluding parenthesis, separated by spaces. - Students matching at least one keyword will be returned.
Examples:
-
find John- Returns
JohnandJohn Doe
- Returns
-
find John Jane- Returns any student having names
JohnorJane
- Returns any student having names
-
find J- Returns any student having names starting with
J
- Returns any student having names starting with
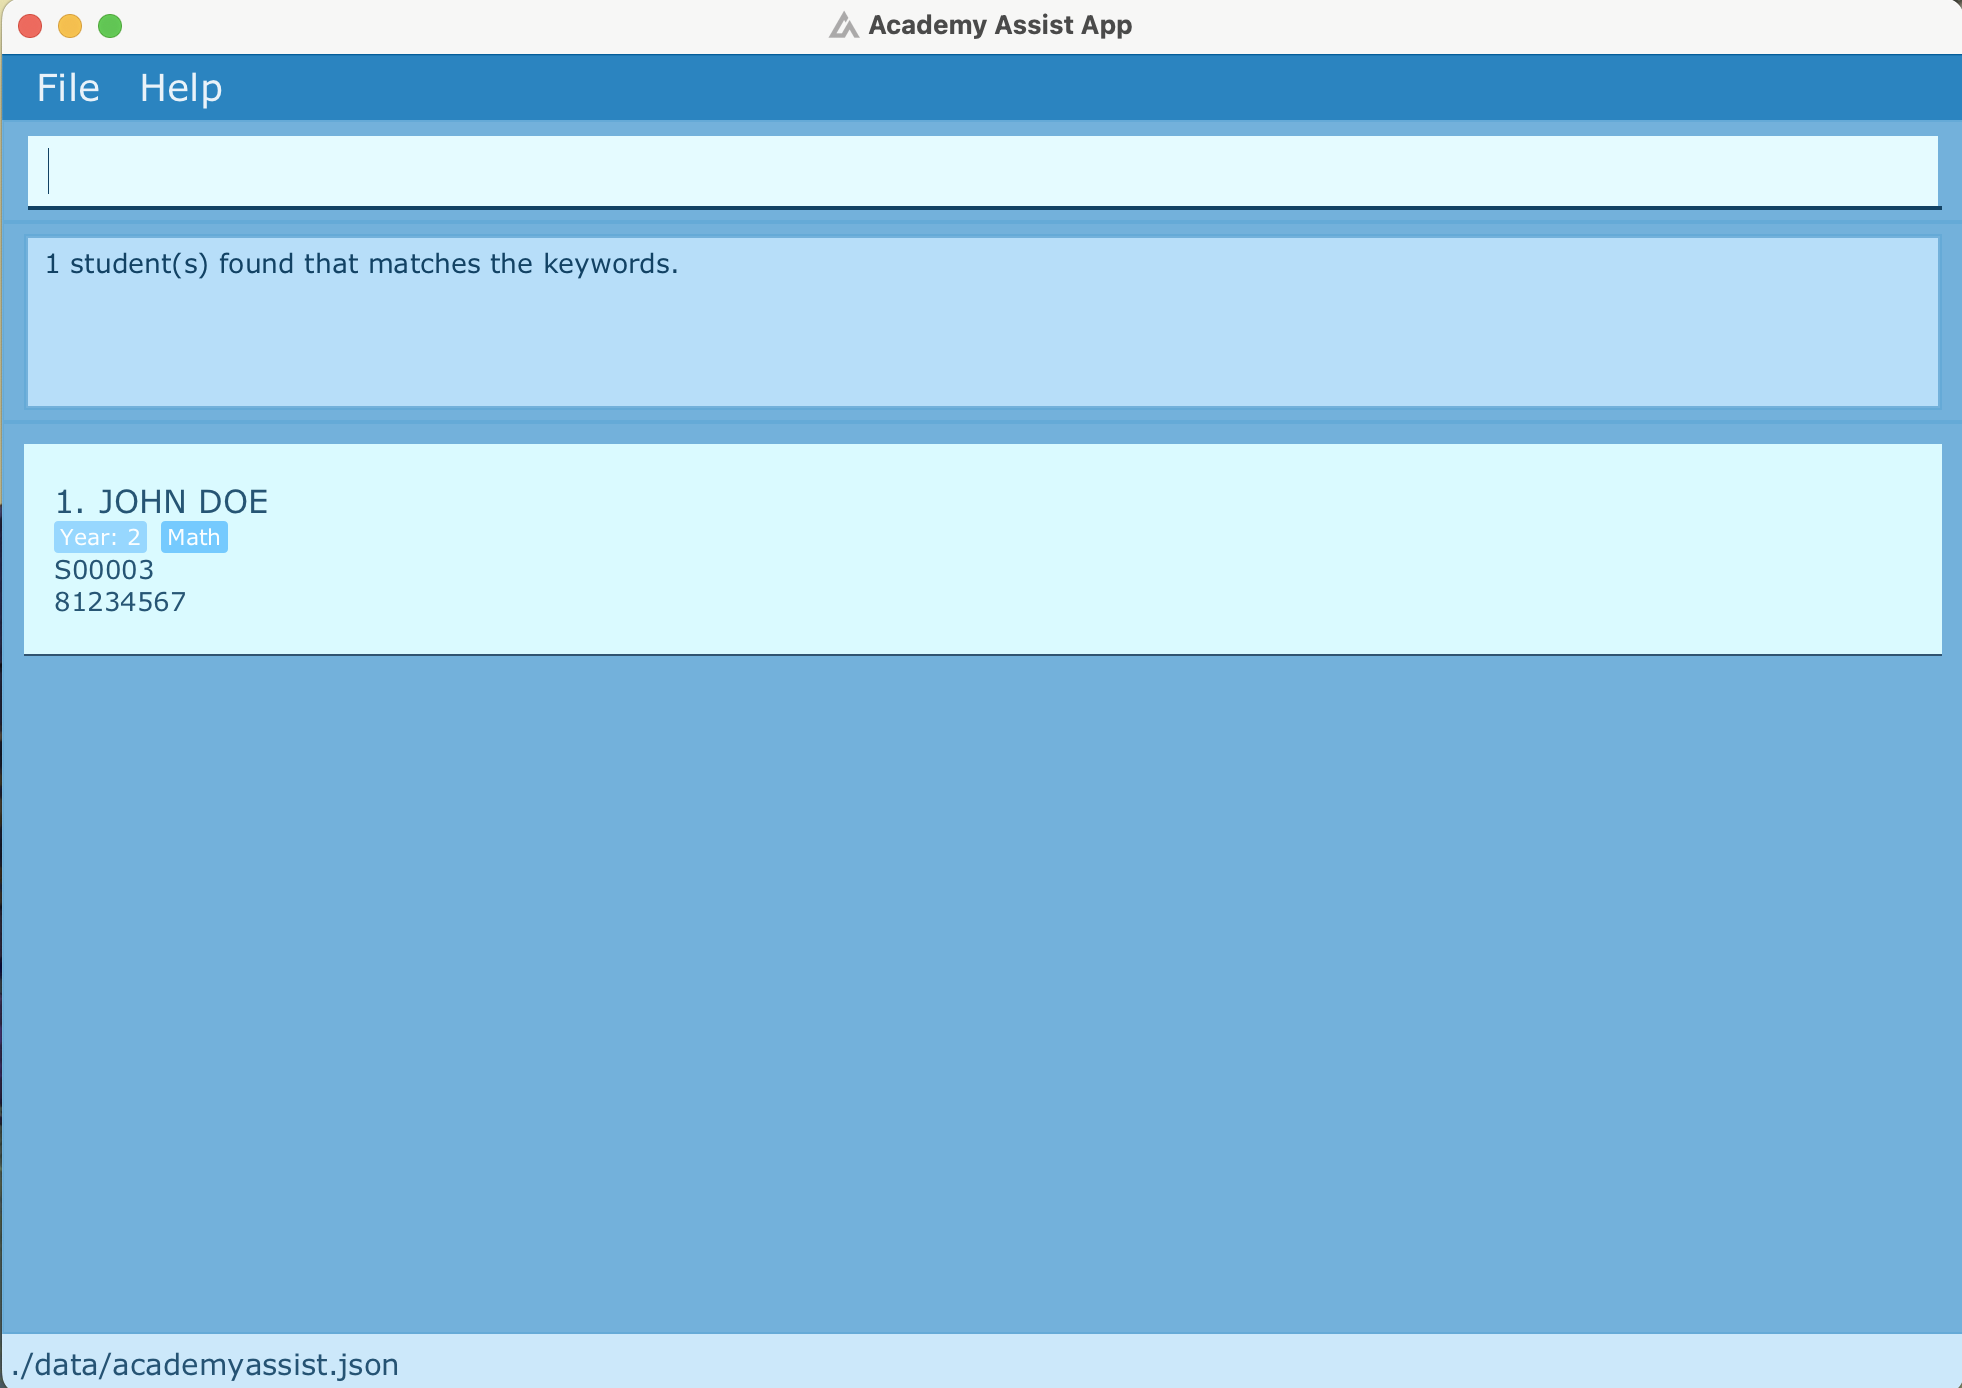
find command to locate the student ID, which allows the admin to use other commands like edit, detail, addsubject, etc., that require the student ID.
list command to return to the full list of students.
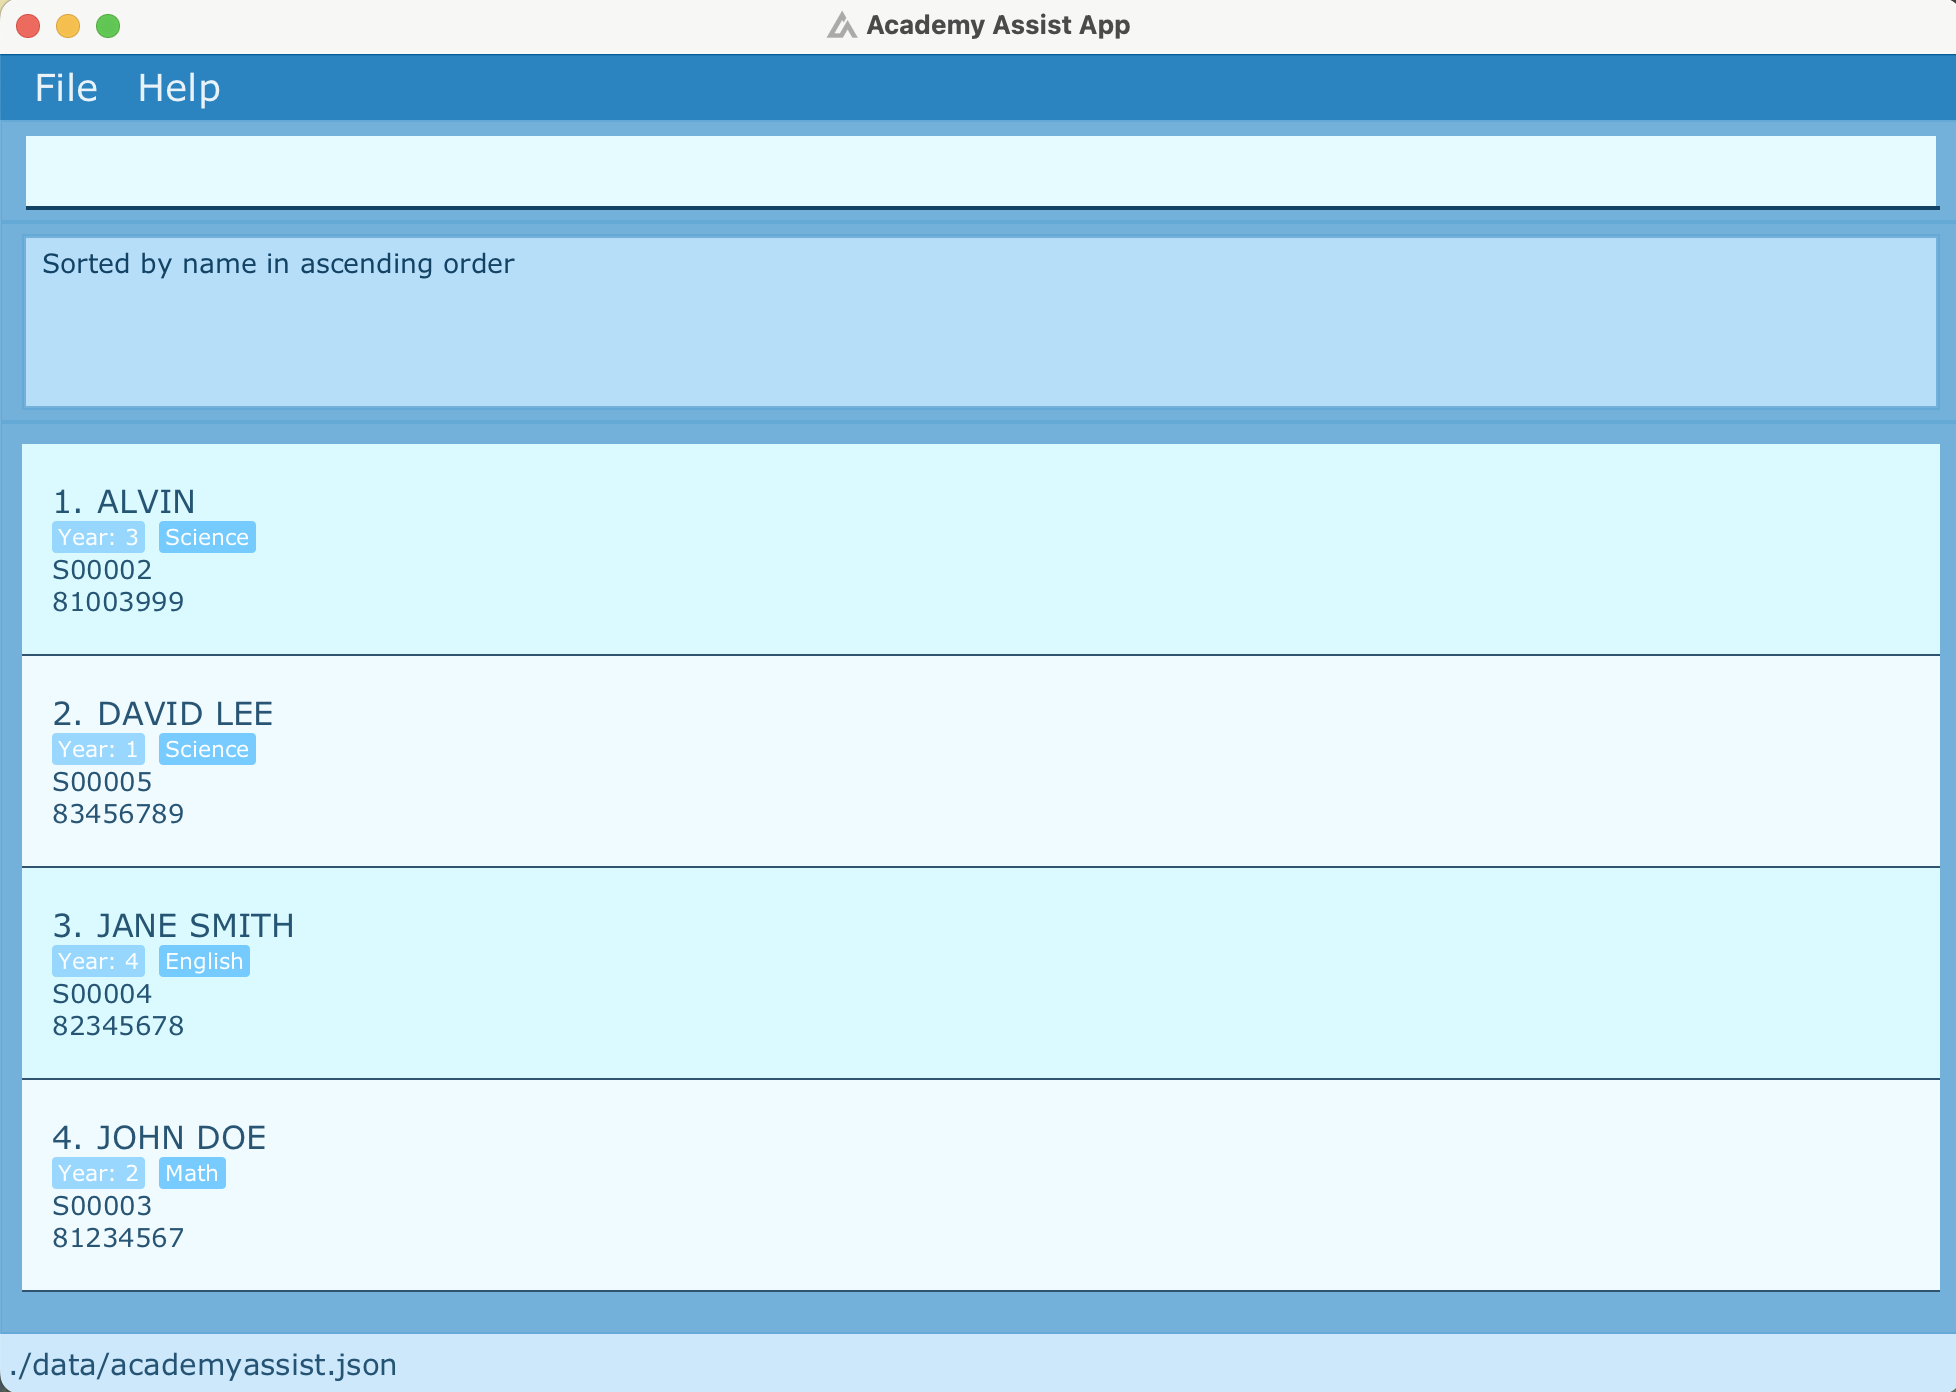
Sorting students : sort
Sort the list of students based on a specified field.
Format: sort by\FIELD
-
FIELD: Can be eithername,subject,studentIDoryearGroup. - Sorting by name will sort students in lexicographical ascending order of their names.
- Sorting by subject will sort students based on the lexicographically smallest subject they are taking.
- Sorting by studentID will sort students based on ascending order of studentID.
- Sorting by yearGroup will sort students in ascending order based on their year group.
NAME is not the same as name). Hence, FIELDs should be in lowercase.
Examples:
-
sort by\name- Sorts the students by their names.
-
sort by\subject- Sorts the students by the subjects.
-
sort by\yearGroup- Sorts the students by their year group.
-
sort by\studentId- Sorts the students by their student ID.
sort by\name command, only year
group 2 students will be sorted.
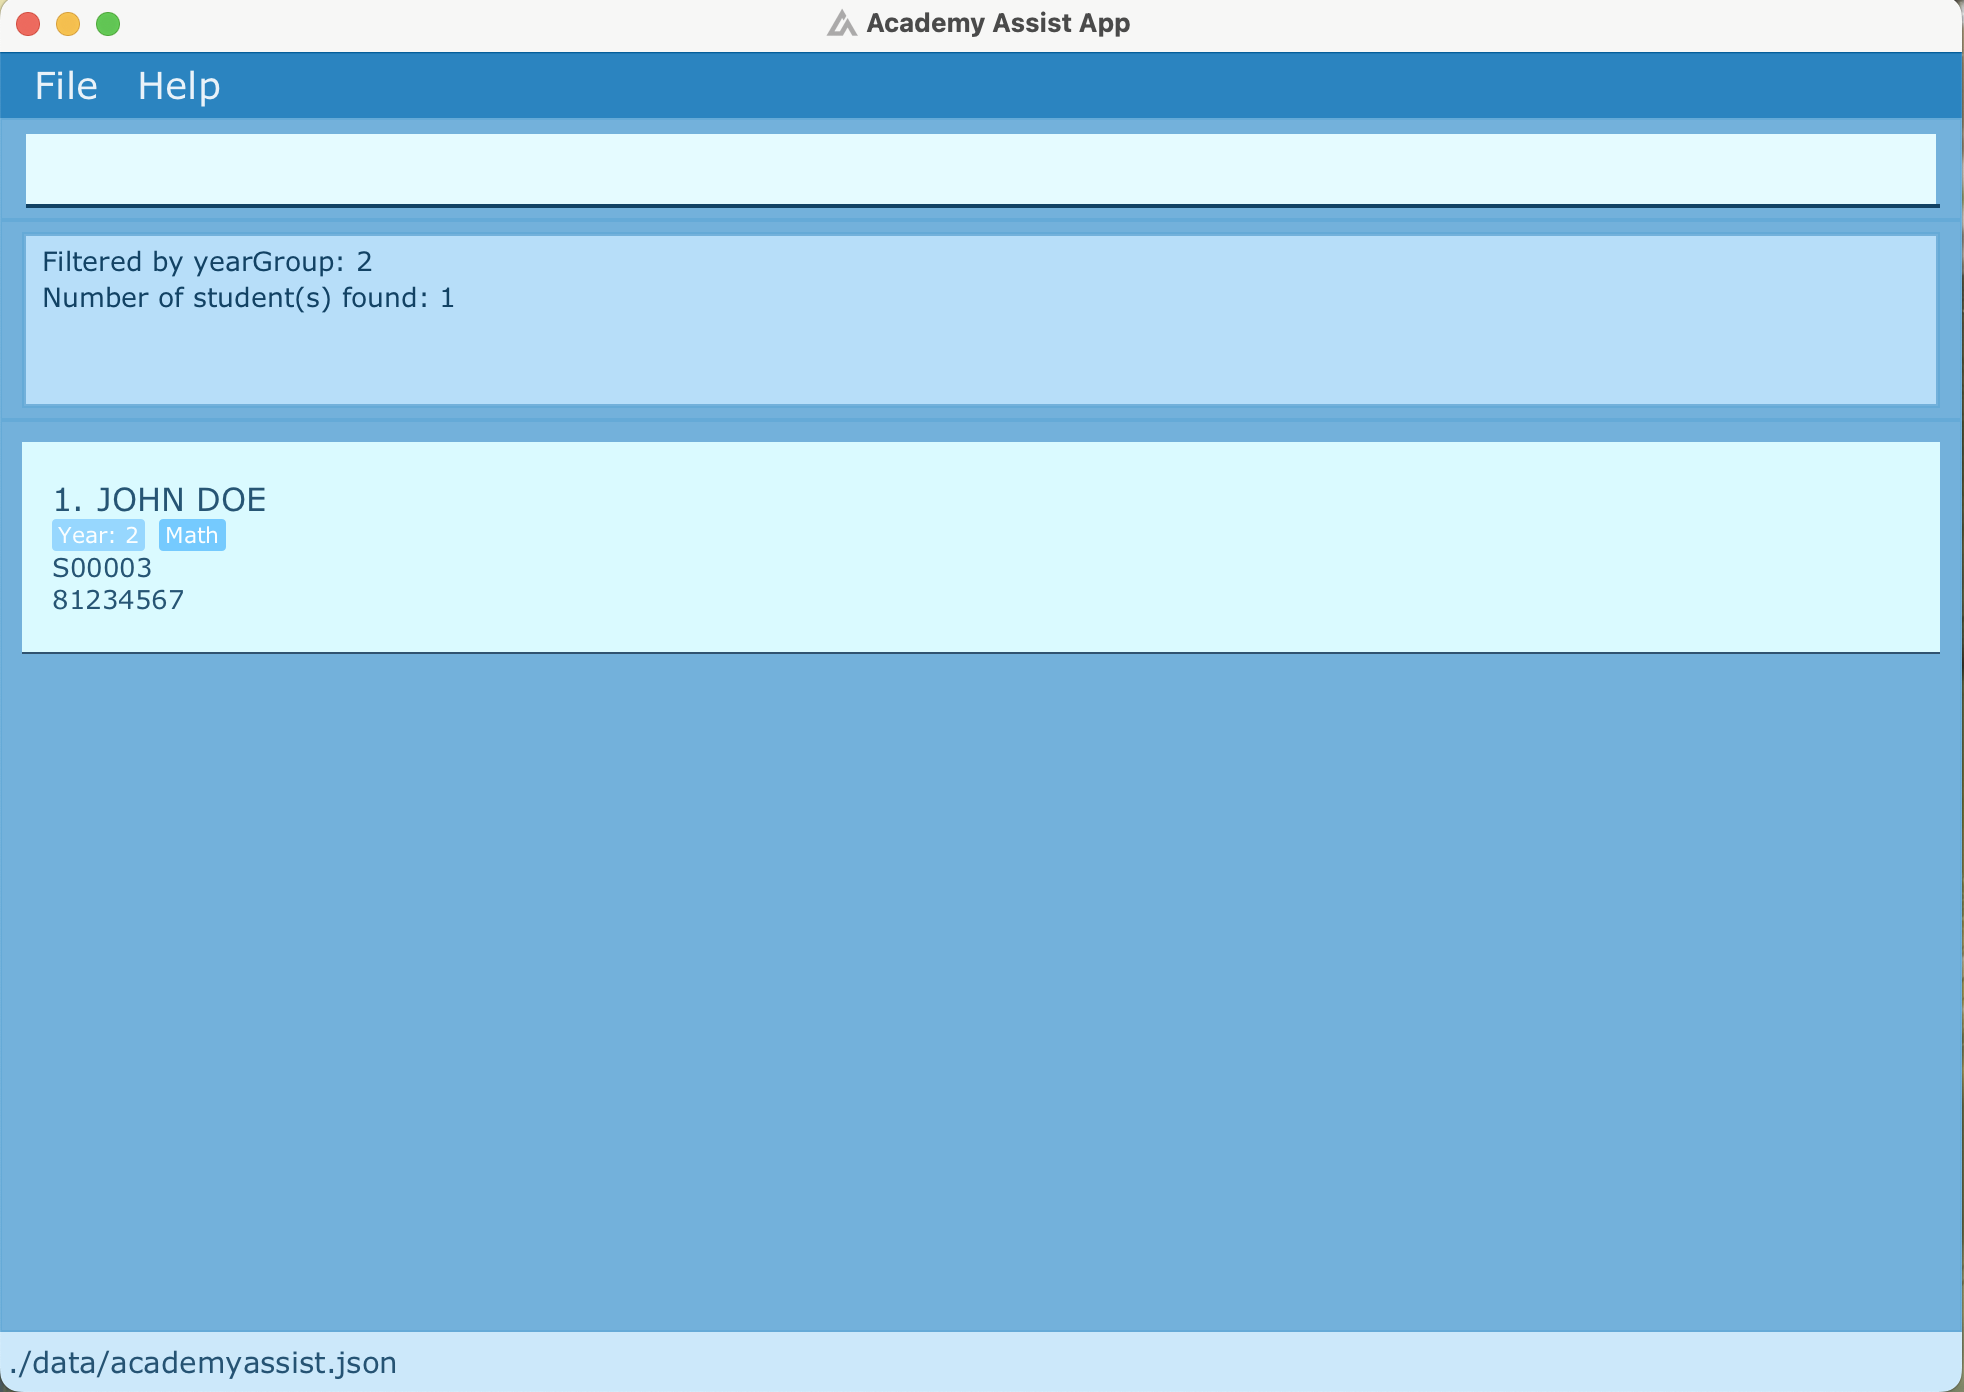
Filtering students : filter
Shows a list of students filtered by year group or subject.
Format: filter FIELD\VALUE
- You can only filter by EITHER year group or class.
- You can only filter one value (eg. filter by Science only).
Examples:
-
filter yg\2- Filters the list to show only year group 2 students.
-
filter s\Science- Filters the list to show only students taking Science.
list command to return to the full list of students.
filter function can be useful for tracking the number of students, as the number of students in the filtered list
will be displayed.
tracksubject allows you to see what subjects are taken by the students in the current year group.
Subject Management
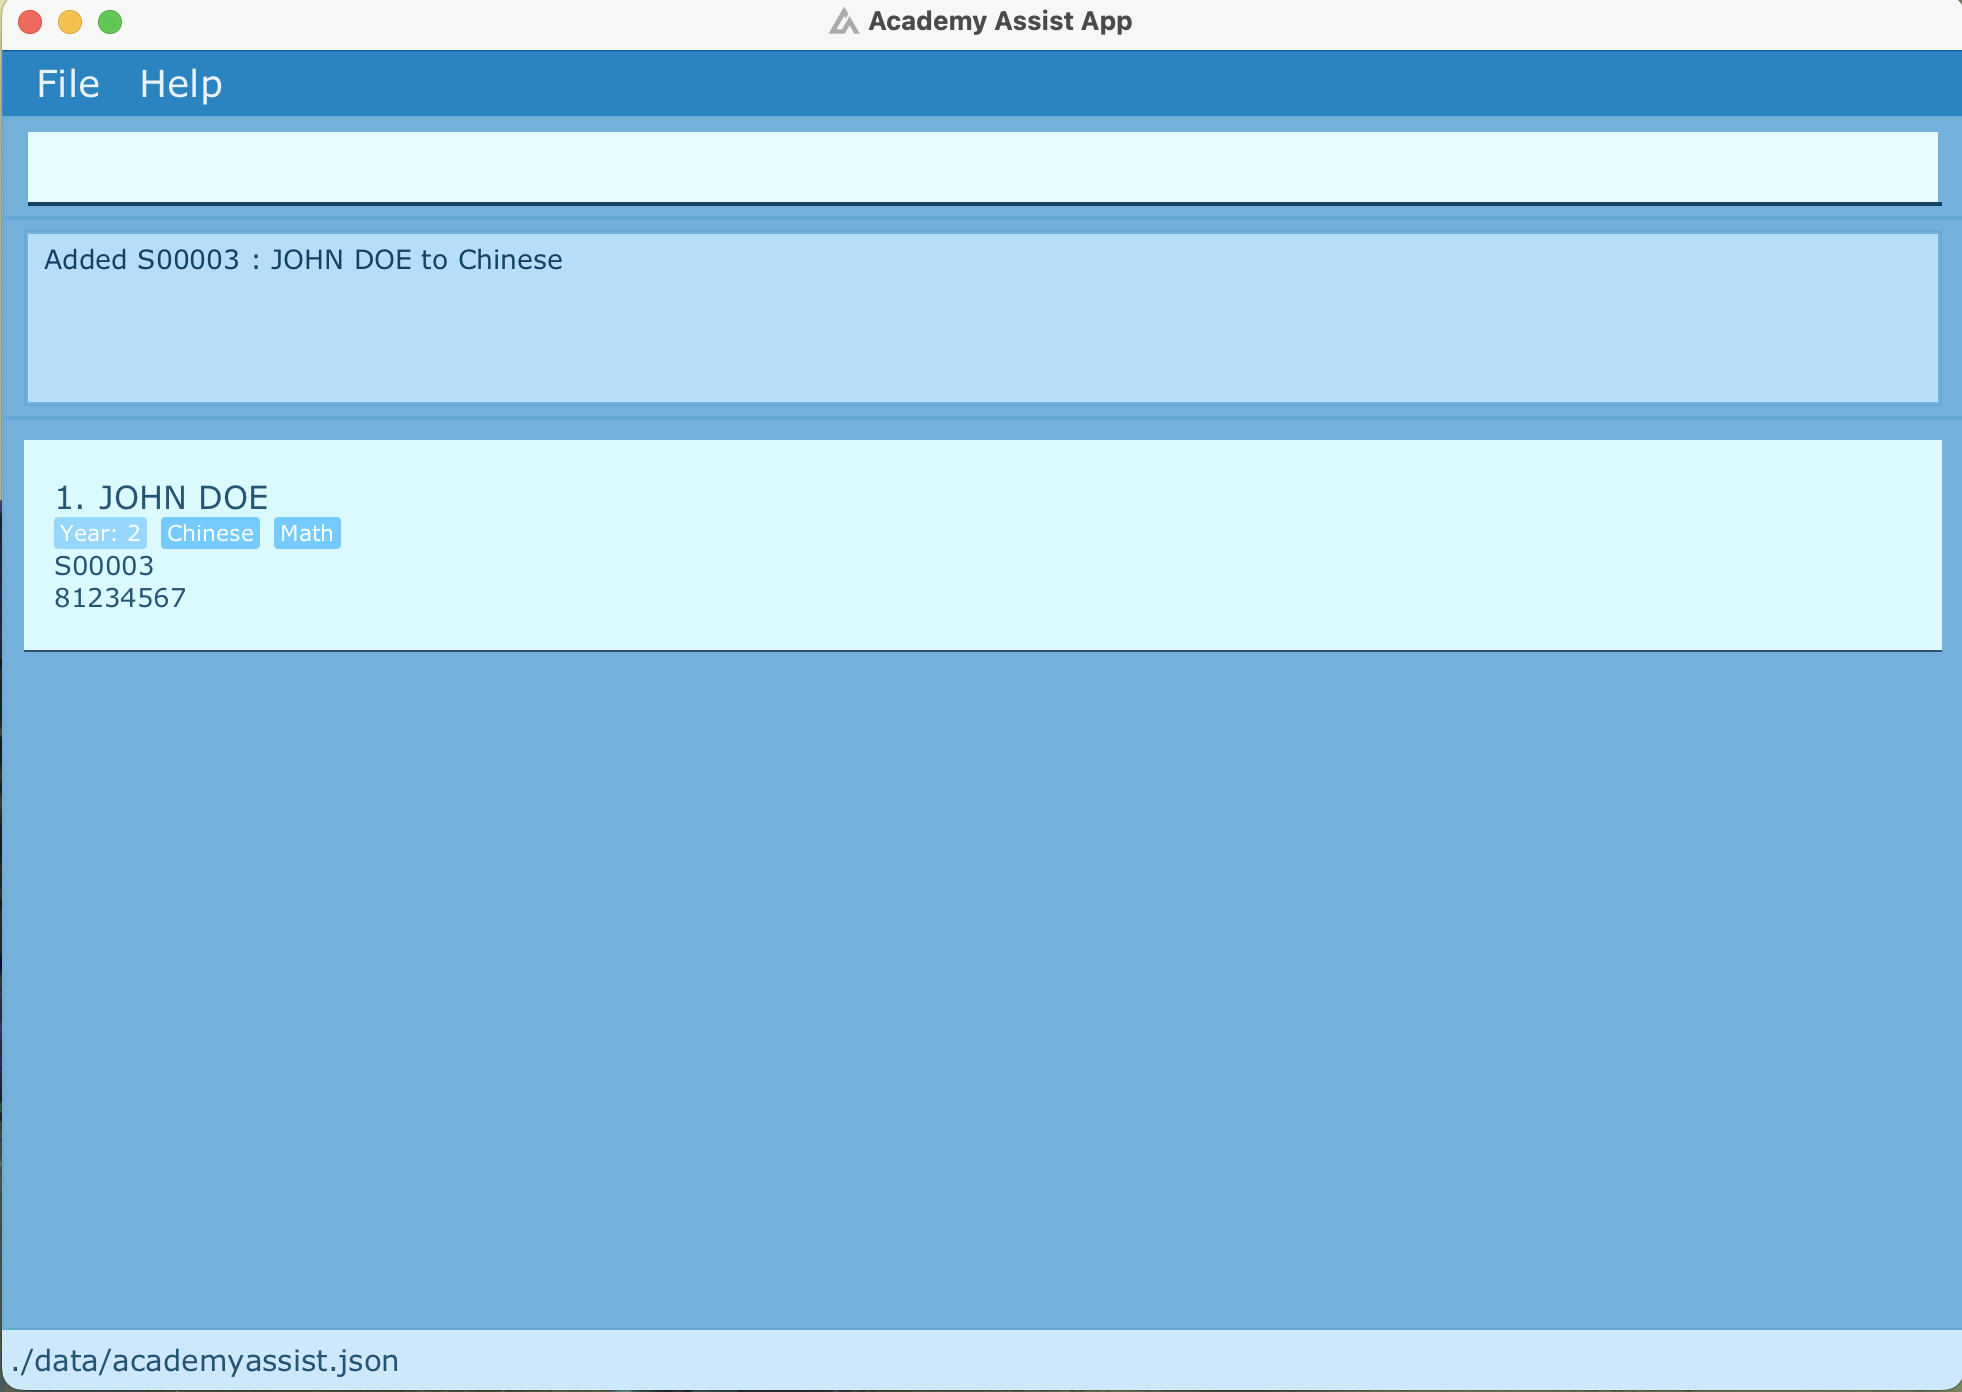
Adding subject(s) to a student : addsubject
Adds one or more subjects to an existing student’s record.
Format: addsubject STUDENT_ID s\SUBJECT [s\MORE_SUBJECTS]...
-
STUDENT_ID: Should begin with S followed by a 5-digit, starting from 00001 to 99999.- The ID of a student is automatically assigned when the student contact is first added and can be found by viewing the student’s details.
-
SUBJECT: Only the subjects listed below are allowed.- Subjects available: English, Chinese, Malay, Tamil, Math, Further Math, Science, History, Geography, Literature, Economics, Accounting, Business, Physics, Chemistry, Biology and Computing.
-
[MORE_SUBJECTS]: Optional, and you can add multiple subjects by repeating thes\field. The same constraints asSUBJECTapply.
s\Science s\Science, only one Science subject
will be added.
Examples:
-
addsubject S00001 s\Science- Adds the subject Science to the student with the ID S00001.
-
addsubject S00002 s\Science s\Math- Adds the subjects Science and Math to the student with the ID S00002.
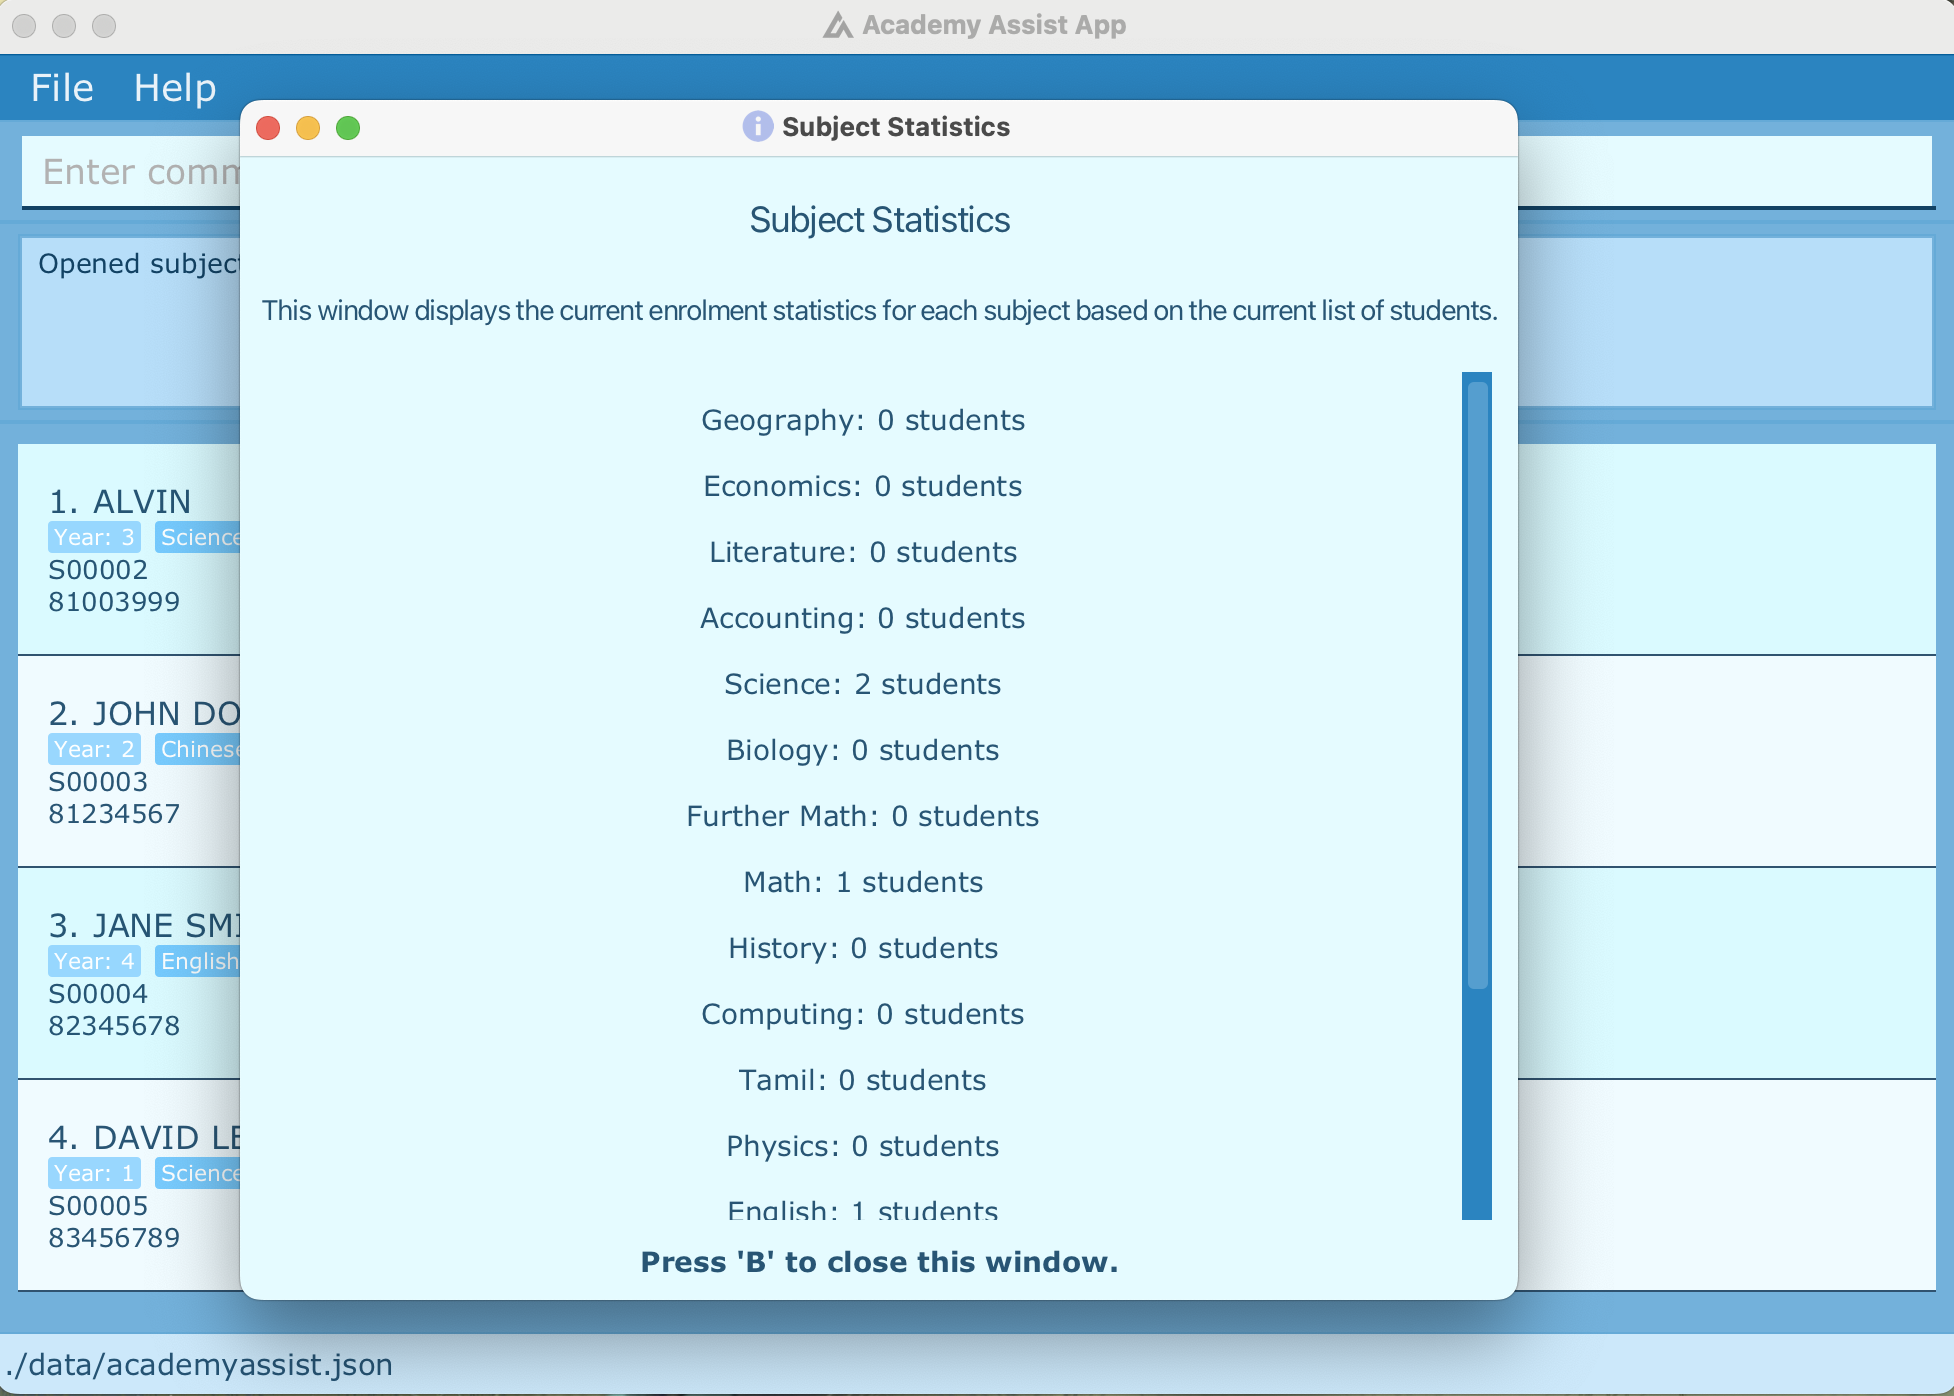
Tracking student count for each subject : tracksubject
Displays a window that shows how many students are taking each of all the subjects.
Format: tracksubject
- The subject count will be displayed in a pop-up window.
- User may use keyboard shortcut
Bto close the pop-up window.
tracksubject command will only show how many year 2 students
are taking each of the subjects.
tracksubject command without closing the pop-up, subsequent commands like list will not update the subject tracker.
Please ensure to close the tracker to view the most current information.
Utility Features
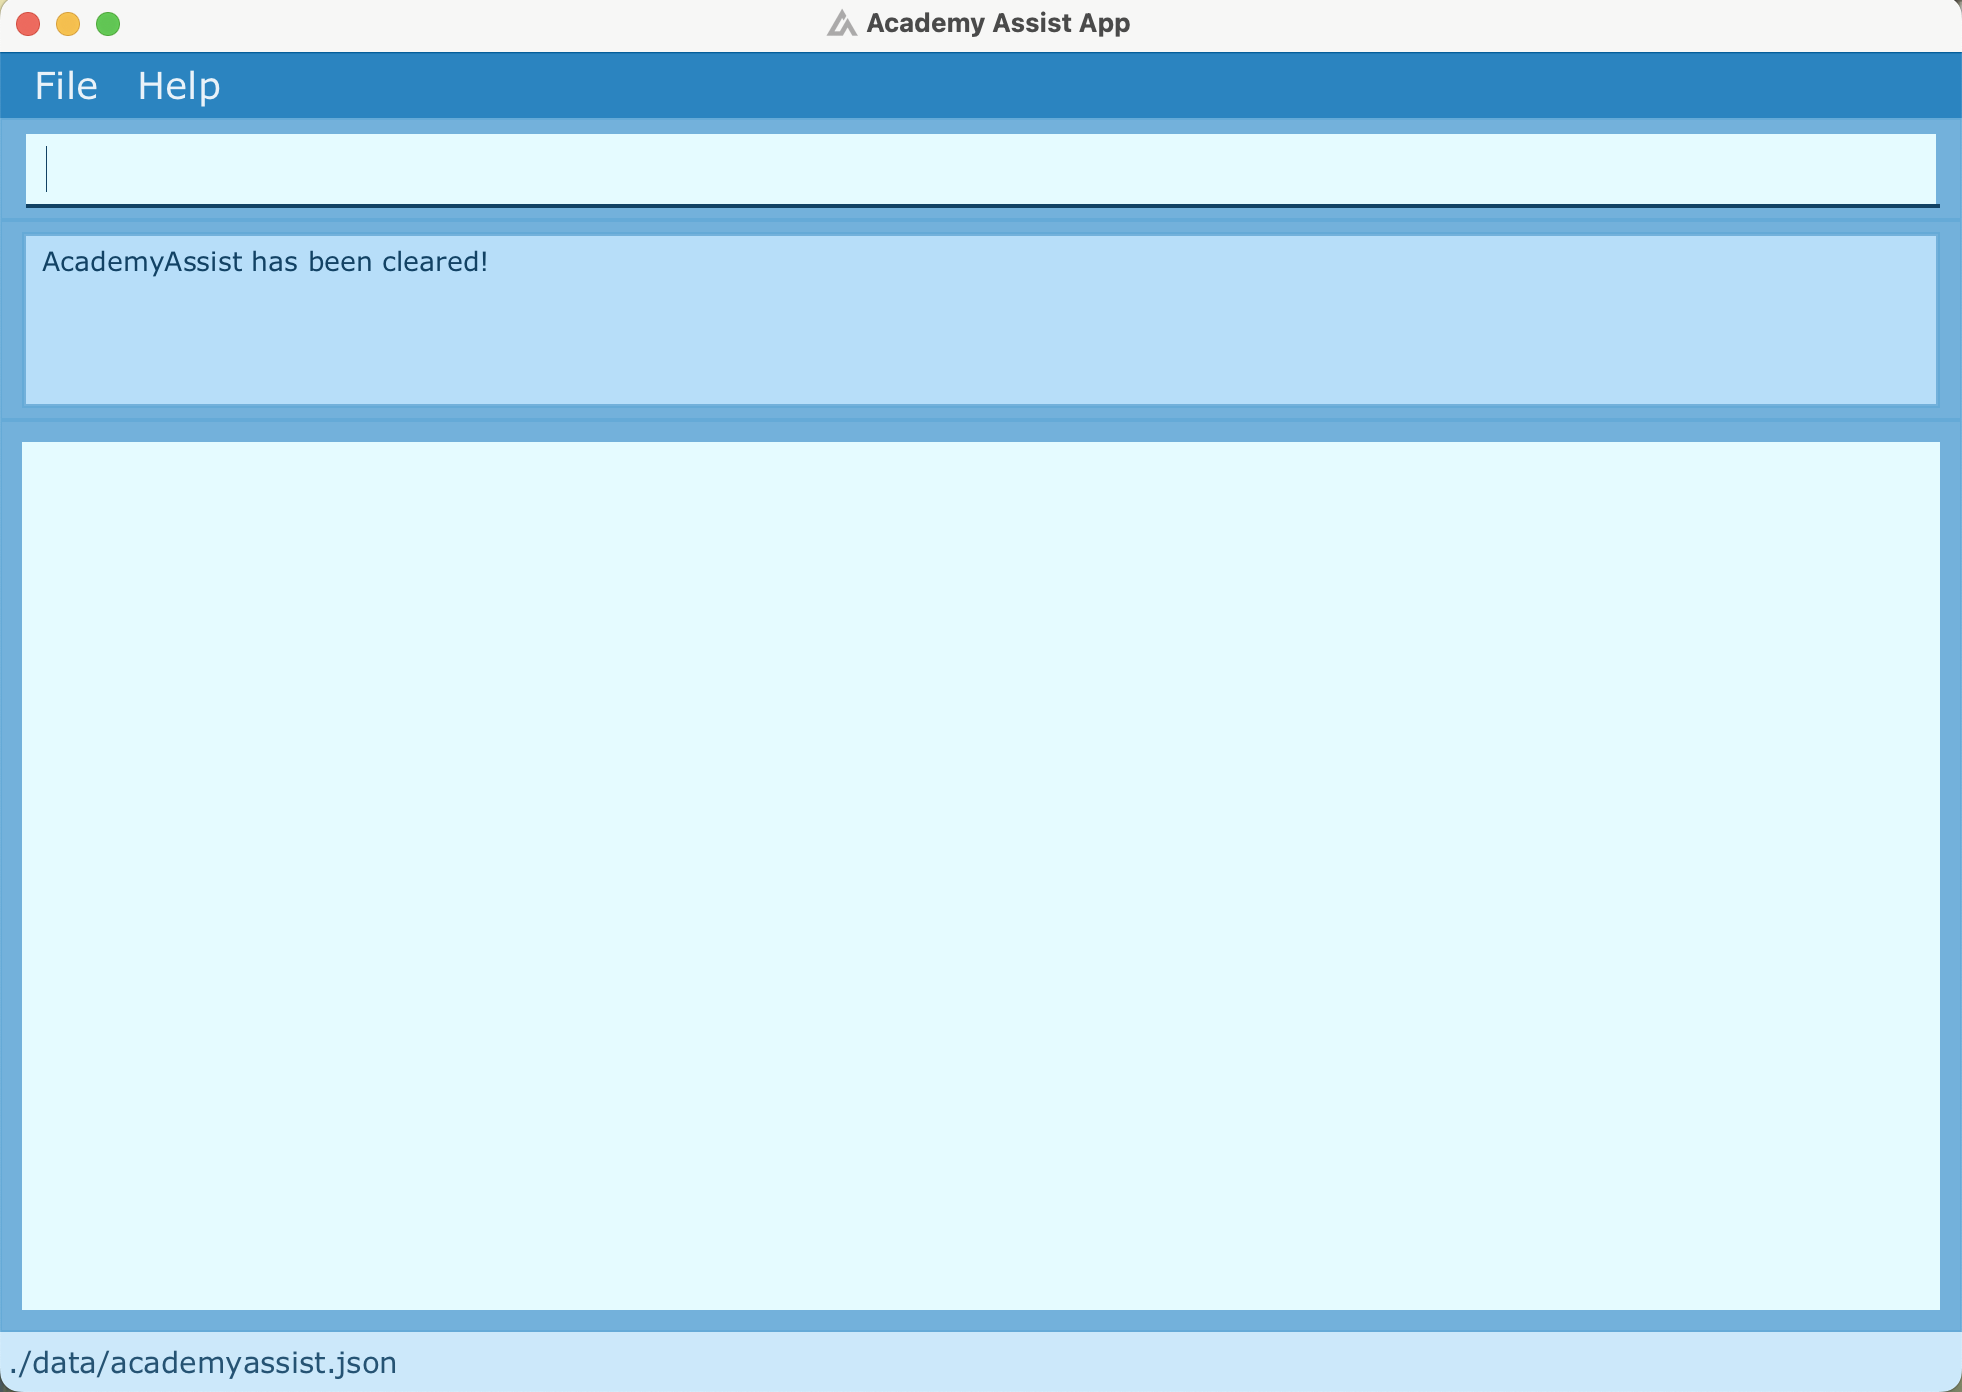
Clearing all entries : clear
Clears all student entries from the system, and resets the studentID to S00001.
Format: clear
Getting help : help
Shows a help window with details of how to use the different commands.
Format: help
Exiting the program : exit
Exits the program.
Format: exit
Data Management in AcademyAssist
Welcome to the Data Management section of AcademyAssist! Here, we’ll explain how your important information is stored and managed.
How Your Data is Saved
Don’t worry about constantly saving your work - AcademyAssist has got you covered! Here’s what you need to know:
-
Automatic Saving: Every time you make a change, like adding a new student or updating information, AcademyAssist saves it right away. You don’t have to do anything!
-
Where Your Data Lives: All your information is safely stored on your computer in a special file. It’s like a digital filing cabinet just for AcademyAssist.
-
Easy to Understand: We use a format called JSON to store your data. While you don’t need to know the details, it’s designed to be easy for both computers and humans to read if needed.
Keeping Your Data Safe
Your information is important, so here are some tips to keep it secure:
-
Make Backups: It’s always a good idea to have an extra copy of your data. Once a week, why not copy your AcademyAssist file to a USB drive or cloud storage?
-
Be Careful with Editing: While it’s possible to open and edit the data file directly, we don’t recommend it unless you’re an expert in CLI applications. It’s safer to make changes through the AcademyAssist program.
Additionally, certain alterations may cause Academy Assist to function improperly (for instance, if a value entered is outside the permissible range). Only edit the data file if you are sure you can do so accurately.
What If Something Goes Wrong?
Don’t panic! AcademyAssist is designed to handle most issues smoothly. But if you do run into problems:
-
Check for Messages: If there’s an issue loading your data, AcademyAssist will show a helpful message explaining what’s wrong.
-
Use Your Backup: This is where your backup copy comes in handy. You can replace the problematic file with your backup to get back on track.
Remember, AcademyAssist is here to make managing student information easy and stress-free. If you ever have questions about your data, just ask - we’re always happy to help! You can reach us via our email (academyassist@gmail.com).
FAQ
This section provides answers to frequently asked questions about AcademyAssist. If you have any other questions or encounter issues while using the application, please feel free to reach out to us via our email (academyassist@gmail.com).
Q: How do I transfer my data to another Computer?
A: Install the app in the other computer and overwrite the empty data file it creates with the file that contains
the data of your previous AcademyAssist folder.
Q: Why is there a gap in the studentID after I deleted a student?
A: This is an intentional design, kindly refer to the note under Features for more details.
Q: Why do the system doesn’t replace the studentID of a deleted student?
A: This is an intentional design. Setting the studentID as irreplacable ensures data consistency and integrity,
similar to a primary key in a database, by preventing duplicate or erroneous entries.
Q: Why is the maximum studentID capped at S99999?
A: The maximum student ID is capped at S99999 to meet the needs of small and medium-sized tuition centers. This
limit is sufficient for managing hundreds of students while providing a safe buffer for growth over the years.
As student IDs are irreplacable, this capacity remains adequate even with operations such as deleting student records.
Q: Some of the subjects I want to add are not available. How can I add them?
A: Currently, the system only supports a predefined set of subjects. However, we are working on a feature that will
allow users to create their own subjects. Stay tuned for updates on this feature!
Q: How can I view the full list of students after filtering or sorting?
A: You can use the list command to view the full list of students after filtering or sorting. This command will
reset the list to display all students in the system.
Q: Why is the subject tracker not updating after filtering the list?
A: The subject tracker must be closed and reopened to refresh the data. If you filter the list and then run the
tracksubject command without closing the pop-up, subsequent commands like list will not update the subject tracker.
Q: I can’t see the full details of a student in the main window. How can I view all the details?
A: Currently, we only display the student’s name, student ID, year group, subjects taken, and phone number in the
main window for a cleaner user interface. To view more detailed information about a student, you can use the detail
command followed by the student’s ID. This will provide you with all the additional details you need.
Upcoming Features
As part of our ongoing efforts to enhance the functionality of the student management system, we are excited to introduce the following features aimed at providing greater flexibility in subject management:
-
Create Subject: Allow users to create their own subjects. Currently, the application only permits a restricted
set of predefined subjects. With this feature, users will be able to tailor the subjects offered in their tuition center
based on their specific needs.
-
Delete Subject: Enable users to delete subjects that are no longer offered by the tuition center. This feature
will also automatically remove the subject tag from students currently enrolled in that subject, ensuring accurate and
up-to-date records.
-
Drop Subject: Allow users to modify the subjects taken by students by dropping a subject. Currently, the system
only supports adding subjects, and if a user wants to remove a subject from a student’s record, they must use the edit
feature and manually note the remaining subjects. This new feature will streamline the process and enhance usability.
-
Add Remark: Enable users to add remarks or comments to student contacts in the future. This feature will allow
users to tag additional information, such as notes about missed payments or other important details, to specific
students. By implementing this functionality, we aim to improve communication and record-keeping, making it easier for
users to manage student interactions effectively
These planned features are designed to improve the administrative capabilities of our student management system, allowing for more efficient subject management. We welcome your feedback and suggestions as we work towards implementing these enhancements!
Glossary
- Command: An instruction given by a user to a computer program.
- Command Line Interface (CLI): A text-based interface for interacting with a program.
- Graphical User Interface (GUI): A visual interface that allows users to interact with a program using graphical elements.
- Command Prompt (Windows)/ Terminal (macOS, Linux): A text-based interface for entering commands to interact with the operating system.
- Java: A high-level, class-based, object-oriented programming language that is designed to have as few implementation dependencies as possible.
- JSON: JavaScript Object Notation, a lightweight data-interchange format that is easy for humans to read and write and easy for machines to parse and generate.
- StudentID: A unique identifier assigned to each student in the system, starting from S00001 to S99999.
- NRIC Number: National Registration Identity Card, a unique identifier assigned to Singapore residents and citizens.